
spring mvc 复习整理一(仗剑走天涯)
什么是Spring Mvc
Spring Web MVC 是最初建立在 Servlet API 之上的 Web 框架,从一开始就包含在 Spring Framework 中。正式名称 Spring Web MVC 来自其源模块的名称 spring-webmvc ,但它更常被称为 Spring MVC
Spring Mvc 发展
先来说一下MVC软件设计思想
M(Model 模型层):完成具体的业务,进行数据的查询 JavaBean
V(View 视图层):用来做展示的 JSP
C(Controller 控制层): 控制器的作用就是搜集页面传来的原始数据,或者调用模型获得数据交给视图层处理 Servlet
jsp –> Servlet –> javaBean
Spring Mvc
分成了几块 视图和数据渲染页面 –> Controller –> Servler –> dao –>数据库
Spring Mvc特点
Spring Mvc基本搭建
1
2
3
4
5
6
7
8
9
10
11
12
13
14
15
16
17
18
19
20
21
22
23
24
25
26
27
28
29
30
31
32
33
34
35
36
37
38
39
40
41
42
43
44
45
46
| <?xml version="1.0" encoding="UTF-8"?>
<project xmlns="http://maven.apache.org/POM/4.0.0"
xmlns:xsi="http://www.w3.org/2001/XMLSchema-instance"
xsi:schemaLocation="http://maven.apache.org/POM/4.0.0 http://maven.apache.org/xsd/maven-4.0.0.xsd">
<modelVersion>4.0.0</modelVersion>
<groupId>com.dream.xiaobo</groupId>
<artifactId>springmvc-review</artifactId>
<version>1.0-SNAPSHOT</version>
<properties>
<maven.compiler.source>11</maven.compiler.source>
<maven.compiler.target>11</maven.compiler.target>
</properties>
<dependencies>
<dependency>
<groupId>javax.servlet</groupId>
<artifactId>javax.servlet-api</artifactId>
<version>4.0.0</version>
</dependency>
<dependency>
<groupId>org.springframework</groupId>
<artifactId>spring-webmvc</artifactId>
<version>5.3.18</version>
</dependency>
</dependencies>
<build>
<plugins>
<plugin>
<groupId>org.apache.maven.plugins</groupId>
<artifactId>maven-compiler-plugin</artifactId>
<version>3.8.1</version>
<configuration>
<target>${maven.compiler.target}</target>
<target>${maven.compiler.source}</target>
<encoding>utf-8</encoding>
</configuration>
</plugin>
</plugins>
</build>
</project>
|
1
2
3
4
5
6
7
8
9
10
11
12
13
14
15
16
17
18
19
20
21
22
23
24
25
26
27
28
29
30
31
32
33
34
35
| <?xml version="1.0" encoding="UTF-8"?>
<web-app xmlns="http://xmlns.jcp.org/xml/ns/javaee"
xmlns:xsi="http://www.w3.org/2001/XMLSchema-instance"
xsi:schemaLocation="http://xmlns.jcp.org/xml/ns/javaee http://xmlns.jcp.org/xml/ns/javaee/web-app_4_0.xsd"
version="4.0">
<listener>
<listener-class>org.springframework.web.context.ContextLoaderListener</listener-class>
</listener>
<context-param>
<param-name>contextConfigLocation</param-name>
<param-value>classpath:spring-mvc.xml</param-value>
</context-param>
<servlet>
<servlet-name>springmvc</servlet-name>
<servlet-class>org.springframework.web.servlet.DispatcherServlet</servlet-class>
<init-param>
<param-name>contextConfigLocation</param-name>
<param-value>classpath:spring-mvc.xml</param-value>
</init-param>
<load-on-startup>1</load-on-startup>
</servlet>
<servlet-mapping>
<servlet-name>springmvc</servlet-name>
<url-pattern>/</url-pattern>
</servlet-mapping>
</web-app>
|
1
2
3
4
5
6
7
8
9
10
11
| <%@ page contentType="text/html;charset=UTF-8" language="java" %>
<html>
<head>
<title>Title</title>
</head>
<body>
${msg}
</body>
</html>
|
1
2
3
4
5
6
7
8
9
10
11
12
13
14
15
16
17
18
19
20
21
22
23
24
25
26
27
28
29
30
31
32
33
34
35
36
| <?xml version="1.0" encoding="UTF-8"?>
<beans xmlns="http://www.springframework.org/schema/beans"
xmlns:xsi="http://www.w3.org/2001/XMLSchema-instance"
xmlns:mvc="http://www.springframework.org/schema/mvc"
xmlns:context="http://www.springframework.org/schema/context"
xsi:schemaLocation="http://www.springframework.org/schema/beans
http://www.springframework.org/schema/beans/spring-beans.xsd
http://www.springframework.org/schema/mvc
http://www.springframework.org/schema/mvc/spring-mvc.xsd
http://www.springframework.org/schema/context
http://www.springframework.org/schema/context/spring-context.xsd
">
<context:component-scan base-package="com.dream.xiaobo"/>
<mvc:default-servlet-handler/>
<mvc:annotation-driven/>
<bean class="org.springframework.web.servlet.handler.BeanNameUrlHandlerMapping"/>
<bean class="org.springframework.web.servlet.mvc.SimpleControllerHandlerAdapter"/>
<bean class="org.springframework.web.servlet.view.InternalResourceViewResolver" id="InternalResourceViewResolver">
<property name="prefix" value="/WEB-INF/page/"/>
<property name="suffix" value=".jsp"/>
</bean>
<bean id="/springMvc" class="com.dream.xiaobo.controller.SpringMvcController"/>
</beans>
|
1
2
3
4
5
6
7
8
9
10
11
12
13
14
15
16
17
18
19
20
21
22
23
24
25
26
27
28
29
30
31
32
33
34
35
36
37
38
39
40
| public class SpringMvcController implements Controller {
@Override
public ModelAndView handleRequest(HttpServletRequest request, HttpServletResponse response) throws Exception {
ModelAndView modelAndView = new ModelAndView();
modelAndView.setViewName("spring-mvc");
modelAndView.addObject("msg","ModelAndView");
return modelAndView;
}
}
````
基于注解式
- controller
```java
@Controller
@RequestMapping(value = "/xiaobo")
public class TestController {
@RequestMapping(value = "/test1")
public ModelAndView test1(){
ModelAndView modelAndView = new ModelAndView();
modelAndView.setViewName("spring-mvc");
modelAndView.addObject("msg","annotation");
return modelAndView;
}
}
|
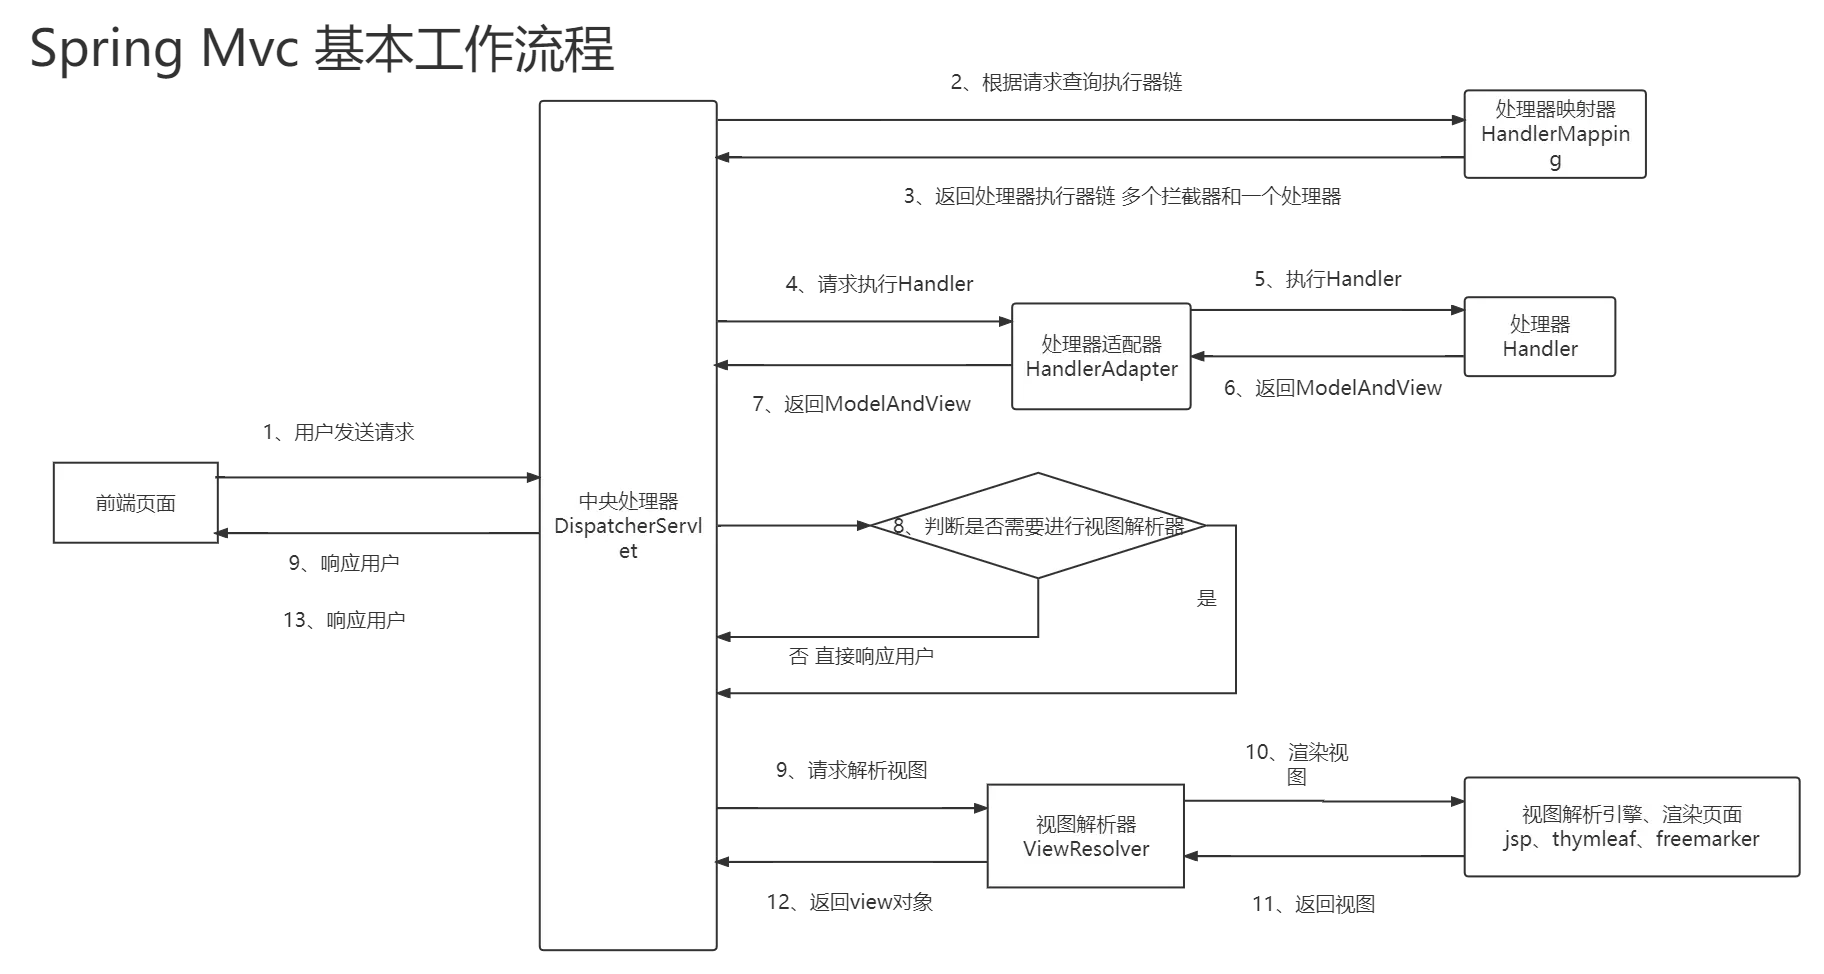
Spring Mvc核心组件
DispatcherServlet:中央处理器,前端控制器
用户请求到达前端控制器(dispatcherServlet),他是整个流程控制的中心,由它负责调用其它组件处理用户的请求,dispatcherServlet的存在降低了组件之间的耦合性。
这玩意可以理解成一个 咨询处,你去某个地方办事,先去咨询处问问我们应该先干什么,等第一件事做完了,可以接着去咨询处咨询,你的下一步工作应该是什么
Handler:处理器
Handler也叫后端控制器,在DispatcherServlet的控制下Handler对 具体的用户请求 进行处理,Handler涉及到 具体的用户业务请求 这玩意就是你写的controller
View:视图
一般情况下,需要通过 页面标签或页面模版技术 将模型数据通过页面展示给用户
视图技术:jsp thymeleaf freenmarker
HandlerMapping:处理器映射器
HandlerMapping负责根据 用户请求url 找到 Handler 即处理器,springmvc提供了不同的 处理器映射器 实现,如配置文件方式,实现接口方式,注解方式等
Handleadapter: 处理器适配器
HandlerAdapter负责调用具体的处理器,这是适配器模式的应用,通过扩展适配器可以对更多类型的处理器进行执行。我们写的controller中的方法,将来就是会由处理器适配器调用
ViewResolver:视图解析器
View Resolver负责将处理结果生成View视图,View Resolver首先根据 逻辑视图名 解析成 物理视图名 即具体的页面地址,再生成View视图对象,最后对View进行渲染将处理结果通过页面展示给用户
Spring Mvc执行流程
三个上下文
ServletController
对于一个web应用,其部署在web容器中,web容器提供其一个全局的上下文环境,这个上下文就是我们的ServletContext,其为后面的spring IoC容器提供一个宿主环境
Spring上下文
在web.xml的配置中,我们需要提供一个监听器 ContextLoaderListener 。在web容器启动时,会触发 容器初始化 事件,此时contextLoaderListener会监听到这个事件,其contextInitialized方法会被调用
在这个方法中,spring会初始化一个 上下文 ,这个上下文被称为 根上下文 ,即 WebApplicationContext ,这是一个接口类,其实际的实现类是XmlWebApplicationContext。这个就是spring的IoC容器,其对应的Bean定义的配置由web.xml中的 context-param 配置指定,默认配置文件为 /WEB-INF/applicationContext.xml
在这个IoC容器初始化完毕后,spring以 WebApplicationContext.ROOTWEBAPPLICATIONCONTEXTATTRIBUTE 为属性Key,将其存储到ServletContext中,便于将来获取
1
2
3
4
5
6
7
8
9
10
|
<listener>
<listener-class>org.springframework.web.context.ContextLoaderListener</listener-class>
</listener>
<context-param>
<param-name>contextConfigLocation</param-name>
<param-value>classpath:spring-mvc.xml</param-value>
</context-param>
|
Spring Mvc上下文
DispatcherServlet在初始化的时候会建立自己的IoC上下文,用以持有 spring mvc相关的bean 。在建立DispatcherServlet自己的IoC上下文时,会利用WebApplicationContext.ROOTWEBAPPLICATIONCONTEXTATTRIBUTE先从ServletContext中获取之前的 根上下文 作为自己上下文的 parent上下文。有了这个parent上下文之后,再初始化自己持有的上下文,这个上下文本质上也是XmlWebApplicationContext,默认读取的配置文件是 /WEB-INF/springmvc-servlet.xml ,当然我们也可以使用init-param标签的 contextConfigLocation属性 进行配置
注意
springMVC容器只负责创建Controller对象,不会创建service和dao,并且他是一个子容器。而spring的容器只负责Service和dao对象,是一个父容器。子容器可以看见父容器的对象,而父容器看不见子容器的对象,这样各司其职
Spring Mvc核心技术
视图和模型
Model会在调用handler时通过参数的形式传入
View可以简化为字符串形式返回
1
2
3
4
5
6
7
| @RequestMapping(value = "/test2")
public String test2(Model model){
model.addAttribute("msg","hello Spring MVC");
return "spring-mvc";
}
|
重定向和转发
重定向
返回视图字符串加前缀redirect就可以进行重定向
转发
返回视图字符串加前缀forward就可以进行请求转发,而不走视图解析器
1
| forward:/xiaobo/userDemo1
|
RequestMapping和衍生注解
是一个方法级的注解,还是一个类级注解
如果放在类上,相当于给每个方法默认都加上一个前缀url
好处
一个类一般处理一类业务,可以统一加上前缀,好区分
简化书写复杂度
属性
value: 指定请求的实际地址,指定的地址可以是URI Template
method: 指定请求的method类型, GET、POST、PUT、DELETE等
consumes:指定处理中的请求的内容类型(Content-Type) 例如application/json
produces:指定返回响应的内容类型,仅当request请求头中的(Accept)类型中包含该指定类型才返回
params: 指定request中必须包含某些参数值处理器才会继续执行
headers: 指定request中必须包含某些指定的header值处理器才会继续执行
1
2
3
| @RequestMapping(value = "/test2",method = RequestMethod.POST,
consumes = "application/json",produces = "text/html;charset=utf-8",
headers = "name",params = {"age","sex"})
|
衍生注解
@GetMapping
@PostMapping
@PutMapping
@DeleteMapping
url模式匹配
| 匹配方式 |
优先级 |
| 全路径匹配,例如:配置路由/a/b/c |
第一优先级 |
| 带有{}路径的匹配,例如:/a/{b}/c |
第二优先级 |
| 正则匹配,例如:/a/{regex:\d{3}}/c |
第三优先级 |
| 带有路径的匹配,例如:/a/b/ |
第四优先级 |
| 带有路径的匹配,例如:/a/b/ |
第五优先级 |
|
仅仅是双通配符:/** | 最低优先级 |
传参
默认传参
当参数和表单中input中的name属性相同时 Spring Mvc自动映射
@RequestParam
@RequestParam注解将 请求参数 (即查询参数或表单数据)绑定到控制器中的方法参数
默认情况下,使用此注解的方法参数是必需的,但我们可以通过将@RequestParam注解的 required标志设置 为 false来指定方法参数是可选的。如果目标方法参数类型不是String,则应用会自动进行类型转换
使用@RequestParam是可选的。默认情况下,任何属于简单值类型且未被任何其他参数解析器解析的参数都被视为使用 @RequestParam
@RequestHeader注解将请求的首部信息绑定到控制器中的方法参数中
@CookieValue
@CookieValue注解将请求中的 cookie 的值绑定到控制器中的方法参数
@ModelAttribute
@ModelAttribute注解在方法参数上来访问【模型中的属性】,或者在不存在的情况下对其进行实例化
@SessionAttribute
如果您需要访问全局管理的预先存在的会话属性,并且可能存在或可能不存在,可以@SessionAttribute在方法参数上使用注解
@RequestAttribute
和@SessionAttribute一样,您可以使用@RequestAttribute注解来访问先前创建的存在与请求中的属性
@SessionAttributes
@SessionAttributes注解应用到Controller上面,可以将Model中的属性同步到session当中
1
2
3
4
5
6
7
8
9
10
11
12
13
14
15
16
17
18
19
20
21
22
23
24
25
26
27
28
29
30
31
32
33
34
35
36
37
38
39
40
41
42
43
44
45
46
47
48
49
50
51
52
53
54
55
| @Controller
@RequestMapping(value = "/xiaobo")
@SessionAttributes(value = {"now","date"})
public class TestController {
@GetMapping
public String forward(HttpServletResponse response,
HttpSession session,
HttpServletRequest request,
Model model
){
Cookie cookie = new Cookie("name","xiaobo");
session.setAttribute("sessionName","session");
request.setAttribute("requestName","request");
response.addCookie(cookie);
model.addAttribute("now","now");
model.addAttribute("date",new Date());
return "forward:/xiaobo/userDemo1";
}
@RequestMapping(value = "/userDemo1")
public String userDemo1(@RequestParam(value = "userName",required = false) String username,
@RequestParam(value = "passWord",required = false) String password,
@RequestHeader(required = false) String age,
@CookieValue("name") String name,
@SessionAttribute(value = "sessionName",required = false) String sessionName,
@RequestAttribute(value = "requestName",required = false) String requestName,
@SessionAttribute(value = "now",required = false) String now,
@SessionAttribute(value = "date",required = false) Date date
){
System.out.println("name = " + username);
System.out.println("password = " + password);
System.out.println("name = " + name);
System.out.println("sessionName = " + sessionName);
System.out.println("requestName = " + requestName);
System.out.println(now + ": " + date);
return "user";
}
}
|
数组的传递
1
2
3
4
5
6
7
| @RequestMapping(value = "/test3")
public String test3(@RequestParam("ids")Long[] ids){
System.out.println("Arrays.toString(ids) = " + Arrays.toString(ids));
return "user";
}
|
1
2
3
4
5
6
7
8
9
| POST http://localhost:8080/xiaobo/test3
Content-Type: application/x-www-form-urlencoded
ids=5,2,1
POST http://localhost:8080/xiaobo/test3
Content-Type: application/x-www-form-urlencoded
ids=5&ids=2&ids=1
|
复杂参数的传递
1
2
3
4
5
6
7
8
9
10
11
12
13
14
15
16
17
18
19
20
21
22
23
24
25
26
27
28
29
| <form action="user/queryParam" method="post">
排序字段:<br>
<input type="text" name="sortField">
<hr>
数组:<br>
<input type="text" name="ids[0]"> <br>
<input type="text" name="ids[1]">
<hr>
user对象:<br>
<input type="text" name="user.username" placeholder="姓名"><br>
<input type="text" name="user.password" placeholder="密码">
<hr>
list集合<br>
第一个元素:<br>
<input type="text" name="userList[0].username" placeholder="姓名"><br>
<input type="text" name="userList[0].password" placeholder="密码"><br>
第二个元素: <br>
<input type="text" name="userList[1].username" placeholder="姓名"><br>
<input type="text" name="userList[1].password" placeholder="密码">
<hr>
map集合<br>
第一个元素:<br>
<input type="text" name="userMap['user1'].username" placeholder="姓名"><br>
<input type="text" name="userMap['user1'].password" placeholder="密码"><br>
第二个元素:<br>
<input type="text" name="userMap['user2'].username" placeholder="姓名"><br>
<input type="text" name="userMap['user2'].password" placeholder="密码"><br>
<input type="submit" value="提交">
</form>
|
1
2
3
4
5
6
7
8
| @Data
public class QueryVo {
private String sortField;
private User user;
private Long[] ids;
private List<User> userList;
private Map<String, User> userMap;
}
|
1
2
3
4
5
| @RequestMapping(value = "/queryParam")
public String queryParam(QueryVO queryVo){
System.out.println("queryVo = " + queryVo);
return "index";
}
|
VO、DTO、DO、PO 概念
VO (View Object)视图对象
主要用于展示层与服务层之间的数据传输对象
DTO(Data Transfer Object)数据传输对象
就是从现实世界中抽象出来的有形或无形的业务实体。
DO(Domain Object)领域对象
它跟持久层(通常是关系型数据库)的数据结构形成一一对应的映射关系,如果持久层是关系型数据库,那么,数据表中的每个字段就对应PO的一个属性。
PO(Persistent Object):持久化对象
DTO 和 VO 的属性值基本是一致的,而且他们通常都是 POJO,但两者存在本质上的区别;DTO 代表服务层需要接收的数据和返回的数据,而
VO 代表展示层需要显示的数据
VO、DTO、DO、PO大致流程
用户发出请求(可能是填写表单),表单的数据在展示层被匹配为VO
展示层把VO转换为服务层对应方法所要求的DTO,传送给服务层
服务层首先根据DTO的数据构造(或重建)一个DO,调用DO的业务方法完成具体业务
服务层把DO转换为持久层对应的PO(可以使用ORM工具,也可以不用),调用持久层的持久化方法,把PO传递给它,完成持久化操作
数据传输顺序:VO ===> DTO ===> DO ===> PO
你知道的越多 你不知道的越多 嘿 我是小博 带你一起看我目之所及的世界……