
Spring Cloud NetFlix
负载均衡 Ribbon
Spring Cloud Ribbon 是一个负载均衡解决方案、Ribbon 是 Netflix 发布的负载均衡器、Spring Cloud Ribbon 是基于 Netflix Ribbon 实现的、是一个用于对 HTTP 请求进行控制的负载均衡客户端
Spring Cloud Ribbon 需要结合 Spring Cloud Eureka 来使用、Eureka Server 提供所有可以调用的服务提供者列表、Ribbon 基于特定的负载均衡算法从这些服务提供者中选择要调用的具体实例
代码示例
1
2
3
4
5
6
7
| <dependencies>
<dependency>
<groupId>org.springframework.cloud</groupId>
<artifactId>spring-cloud-starter-netflix-eureka-client</artifactId>
<version>2.0.2.RELEASE</version>
</dependency>
</dependencies>
|
1
2
3
4
5
6
7
8
9
10
11
12
13
| server:
port: 8040
spring:
application:
name: ribbon
eureka:
client:
service-url:
defaultZone: http://localhost:8761/eureka/
instance:
prefer-ip-address: true
|
1
2
3
4
5
6
7
8
9
10
11
12
| @RestController
@RequestMapping(value = "/ribbon")
public class RibbonController {
@Autowired
private RestTemplate restTemplate;
public Collection<Student> findAll(){
return restTemplate.getForObject("http://provider/student/findAll",Collection.class);
}
}
|
1
2
3
4
5
6
7
8
9
10
11
12
13
| @SpringBootApplication
public class RibbonApplication {
public static void main(String[] args) {
SpringApplication.run(RibbonApplication.class,args);
}
@Bean
@LoadBalanced
public RestTemplate restTemplate(){
return new RestTemplate();
}
}
|
@LoadBalanced:声明一个基于 Ribbon 的负载均衡
负载均衡 Feign
与 Ribbon 一样、Feign 也是由 Netflix 提供的、Feign 是一个声明式、模版化的 Web Service 客户端、它简化了开发者编写 Web 服务客户端的操作、开发者可以通过简单的接口和注解来调用 HTTP API、Spring Cloud Feign、它整合了 Ribbon 和 Hystrix、具有可插拔、基于注解、负载均衡、服务熔断等
Feign和ribbon区别
Ribbon 是一个通用的 HTTP 客户端工具,Feign 是基于 Ribbon 实现的
Feign的特点
Feign 是一个声明式的 Web Service 客户端
支持 Feign 注解、Spring MVC 注解、JAX-RS 注解
Feign 基于 Ribbon 实现,使用起来更加简单
Feign 集成了 Hystrix,具备服务熔断的功能
代码示例
1
2
3
4
5
6
7
8
9
10
11
12
13
14
| <dependencies>
<dependency>
<groupId>org.springframework.cloud</groupId>
<artifactId>spring-cloud-starter-netflix-eureka-client</artifactId>
<version>2.0.2.RELEASE</version>
</dependency>
<dependency>
<groupId>org.springframework.cloud</groupId>
<artifactId>spring-cloud-starter-openfeign</artifactId>
<version>2.0.2.RELEASE</version>
</dependency>
</dependencies>
|
1
2
3
4
5
6
7
8
9
10
11
12
13
14
15
16
| server:
port: 8050
spring:
application:
name: feign
eureka:
client:
service-url:
defaultZone: http://localhost:8761/eureka/
instance:
prefer-ip-address: true
feign:
hystrix:
enabled: true
|
feign.hystrix.enabled:是否开启熔断器
1
2
3
4
5
6
7
8
9
10
| @FeignClient(value = "provider", fallback = FeignProviderClientImpl.class)
public interface FeignProviderClient {
@GetMapping(value = "/student/findAll")
public Collection<Student> findAll();
@GetMapping(value = "/student/index")
public String index();
}
|
@FeignClient value:映射提供者
@FeignClient fallback:映射实现类
1
2
3
4
5
6
7
8
9
10
| @Component
public class FeignProviderClientImpl implements FeignProviderClient {
public Collection<Student> findAll() {
return null;
}
public String index() {
return "服务器维护中......";
}
}
|
@Component:注入IOC容器
1
2
3
4
5
6
7
8
9
10
11
12
13
14
15
16
17
| @RestController
@RequestMapping(value = "/feign")
public class FeignController {
@Autowired
private FeignProviderClient feignProviderClient;
@GetMapping(value = "/finAll")
public Collection<Student> findAll(){
return feignProviderClient.findAll();
}
@GetMapping(value = "/index")
public String index(){
return feignProviderClient.index();
}
}
|
1
2
3
4
5
6
7
8
| @SpringBootApplication
@EnableFeignClients
public class FeignApplication {
public static void main(String[] args) {
SpringApplication.run(FeignApplication.class,args);
}
}
|
@EnableFeignClients:开启Feign
容错机制 Hystrix
设计原则
服务隔离机制
服务降级机制
熔断机制
提供实时的监控和报警功能
提供实时的配置修改功能
Hystrix 数据监控需要结合 Spring Boot Actuator(服务监控) 来使用、Actuator(服务监控) 提供了对服务的健康健康、数据统计、可以通过 hystrix.stream 节点获取监控的请求数据、提供了可视化的监控界面
代码示例
1
2
3
4
5
6
7
8
9
10
11
12
13
14
15
16
17
18
19
20
21
22
23
24
25
26
27
28
29
30
31
32
33
34
35
36
37
38
39
40
41
42
43
44
45
46
47
48
49
50
51
| <?xml version="1.0" encoding="UTF-8"?>
<project xmlns="http://maven.apache.org/POM/4.0.0"
xmlns:xsi="http://www.w3.org/2001/XMLSchema-instance"
xsi:schemaLocation="http://maven.apache.org/POM/4.0.0 http://maven.apache.org/xsd/maven-4.0.0.xsd">
<parent>
<artifactId>springcloud1</artifactId>
<groupId>com.dream.com.dream.xiaobo.xiaobo</groupId>
<version>1.0-SNAPSHOT</version>
</parent>
<modelVersion>4.0.0</modelVersion>
<artifactId>hystrix</artifactId>
<dependencies>
<dependency>
<groupId>org.springframework.cloud</groupId>
<artifactId>spring-cloud-starter-netflix-eureka-client</artifactId>
<version>2.0.2.RELEASE</version>
</dependency>
<dependency>
<groupId>org.springframework.cloud</groupId>
<artifactId>spring-cloud-starter-openfeign</artifactId>
<version>2.0.2.RELEASE</version>
</dependency>
<dependency>
<groupId>org.springframework.boot</groupId>
<artifactId>spring-boot-starter-actuator</artifactId>
<version>2.0.7.RELEASE</version>
</dependency>
<dependency>
<groupId>org.springframework.cloud</groupId>
<artifactId>spring-cloud-starter-netflix-hystrix</artifactId>
<version>2.0.2.RELEASE</version>
</dependency>
<dependency>
<groupId>org.springframework.cloud</groupId>
<artifactId>spring-cloud-starter-netflix-hystrix-dashboard</artifactId>
<version>2.0.2.RELEASE</version>
</dependency>
</dependencies>
</project>
|
1
2
3
4
5
6
7
8
9
10
11
12
13
14
15
16
17
18
19
20
21
22
23
24
25
| server:
port: 8060
spring:
application:
name: hystrix
eureka:
client:
service-url:
defaultZone: http://localhost:8761/eureka/
instance:
prefer-ip-address: true
feign:
hystrix:
enabled: true
management:
endpoints:
web:
exposure:
include: 'hystrix.stream'
|
management.endpoints.web.exposure.include:监控hystrix.stream节点
1
2
3
4
5
6
7
8
9
10
| @SpringBootApplication
@EnableFeignClients
@EnableCircuitBreaker
@EnableHystrixDashboard
public class HystrixApplication {
public static void main(String[] args) {
SpringApplication.run(HystrixApplication.class,args);
}
}
|
@EnableCircuitBreaker:声明启用数据监控
@EnableHystrixDashboard:声明启用可视化数据监控
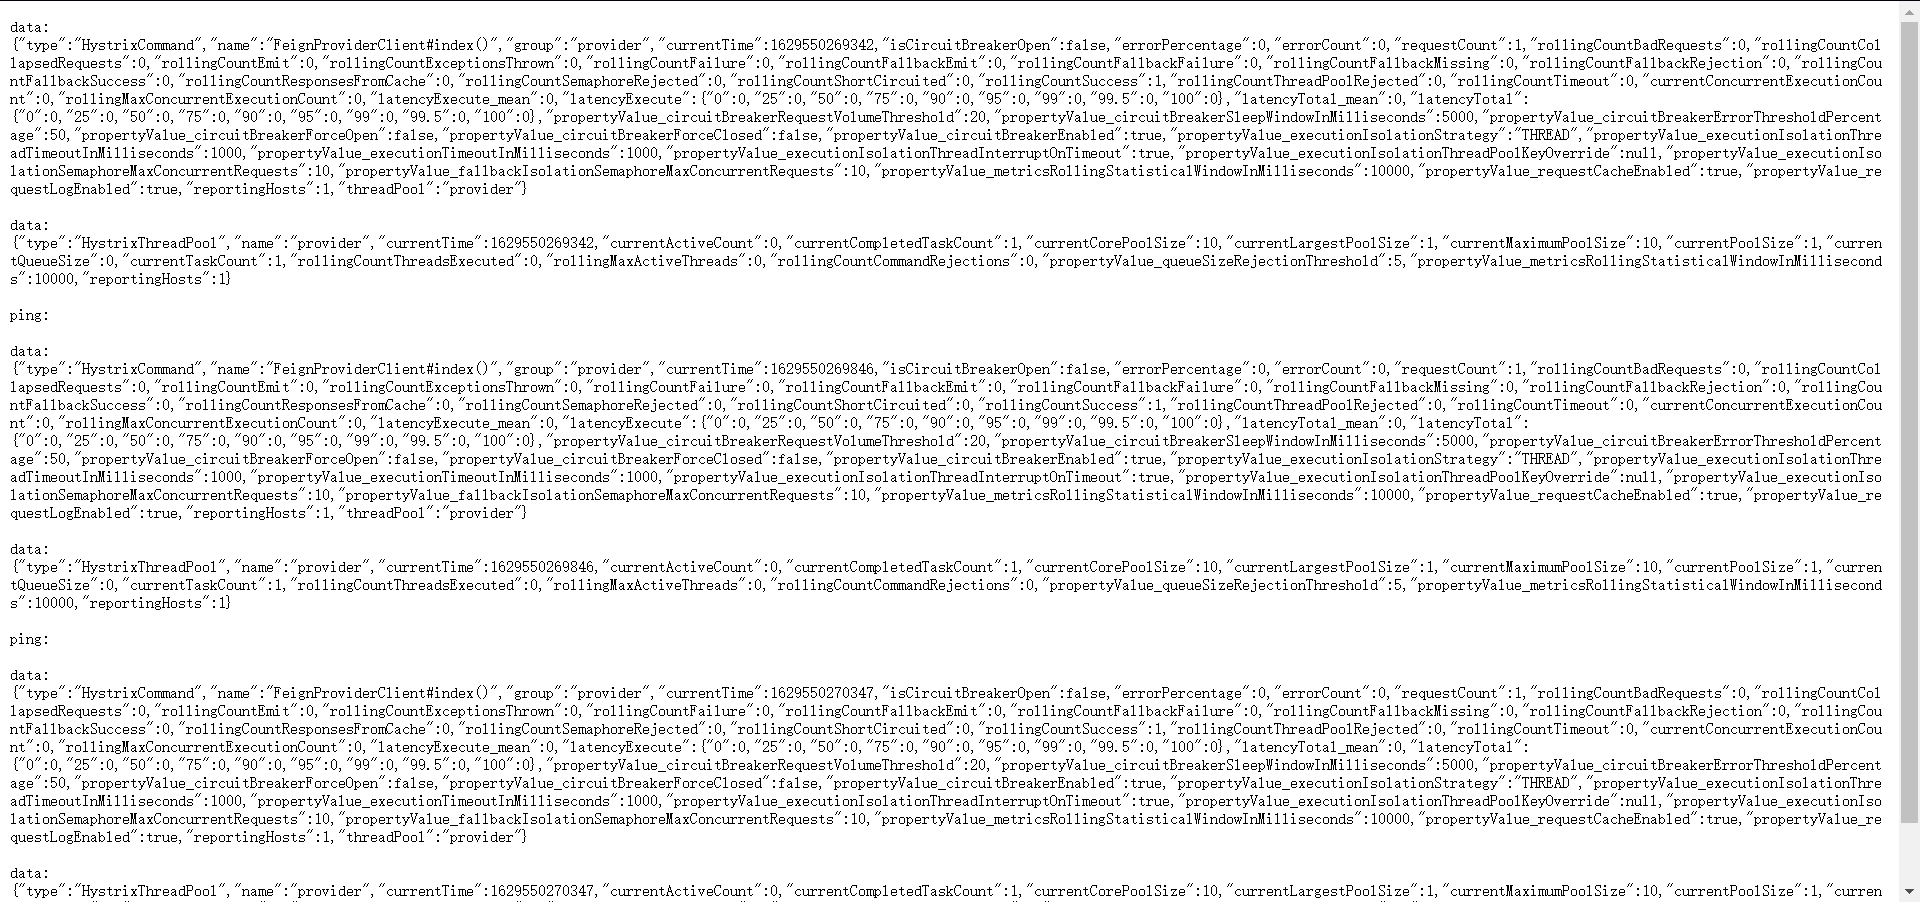
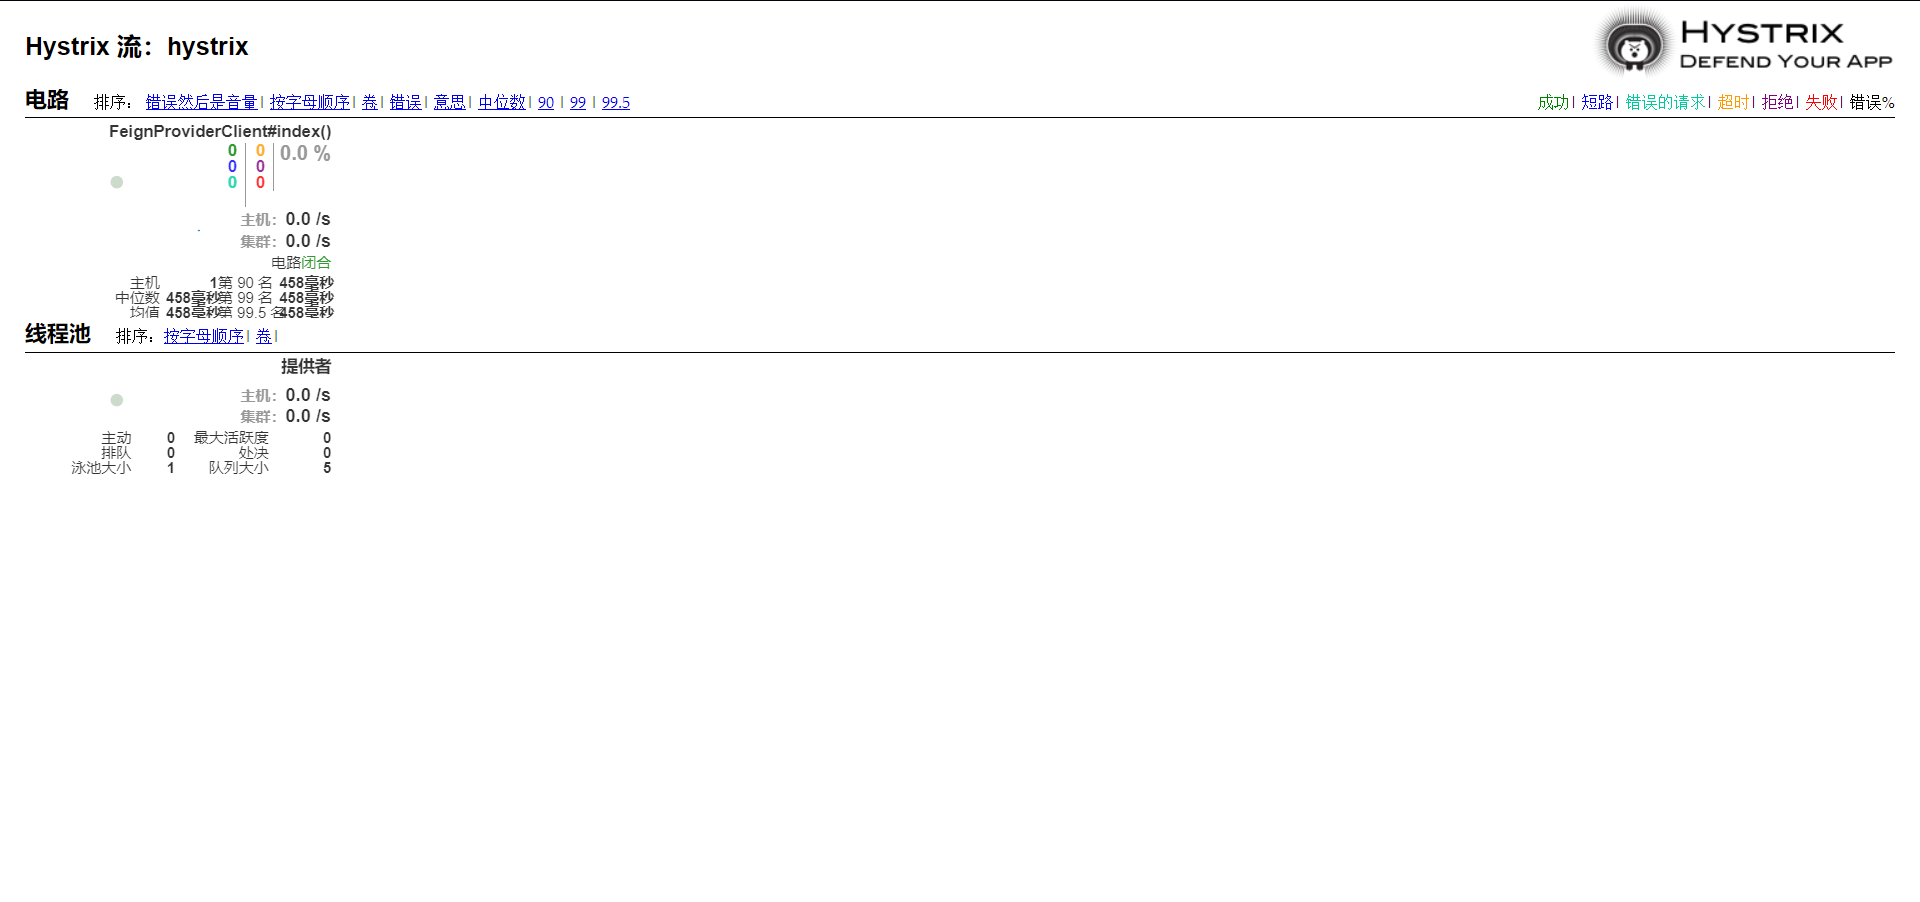
启动成功之后,访问 http://localhost:8060/actuator/hystrix.stream 可以监控到请求数据
访问 http://localhost:8060/hystrix,可以看到可视化的监控界面、输入要监控的地址节点即可看到该节点的可视化数据监控

配置中心(config)
Spring Cloud Config 通过服务端可以为多个客户端提供配置服务、Spring Cloud Config 可以将配置文件存储在本地、也可以将配置文件存储在远程 Git 仓库、创建 Config Server、通过它管理所有的配置文件。
本地配置
server
1
2
3
4
5
6
7
8
9
10
11
| server:
port: 8090
spring:
application:
name: configclient
eureka:
client:
serviceUrl:
defaultZone: http://localhost:8761/eureka/
|
1
2
3
4
5
6
7
| <dependencies>
<dependency>
<groupId>org.springframework.cloud</groupId>
<artifactId>spring-cloud-config-server</artifactId>
<version>2.0.2.RELEASE</version>
</dependency>
</dependencies>
|
1
2
3
4
5
6
7
8
9
10
11
12
| server:
port: 8762
spring:
application:
name: nativeconfigserver
profiles:
active: native
cloud:
config:
server:
native:
search-locations: classpath:/search
|
profiles.active:配置文件的获取方式
cloud.config.server.native.search-locations:本地配置文件存放的路径
1
2
3
| server:
port: 8070
foo: foo version 1
|
1
2
3
4
5
6
7
8
| @SpringBootApplication
@EnableConfigServer
public class NativeConfigServerApplication {
public static void main(String[] args) {
SpringApplication.run(NativeConfigServerApplication.class,args);
}
}
|
@EnableConfigServer:声明配置中心
client
1
2
3
4
5
6
7
| <dependencies>
<dependency>
<groupId>org.springframework.cloud</groupId>
<artifactId>spring-cloud-starter-config</artifactId>
<version>2.0.2.RELEASE</version>
</dependency>
</dependencies>
|
1
2
3
4
5
6
7
8
9
| spring:
application:
name: configclient2
profiles:
active: dev
cloud:
config:
uri: http://localhost:8762
fail-fast: true
|
cloud.config.uri:本地 Config Server 的访问路径
cloud.config.fail-fase:设置客户端优先判断 Config Server 获取是否正常
通过spring.application.name 结合spring.profiles.active拼接目标配置文件名,configclient-dev.yml,去 Config Server 中查找该文件
1
2
3
4
5
6
7
8
9
10
11
12
13
14
15
16
| @RestController
@RequestMapping(value = "/config")
public class NariveConfigController {
@Value("${server.port}")
private String port;
@Value("${foo}")
private String foo;
@GetMapping(value = "/index")
public String index(){
return this.port + "--" + this.foo;
}
}
|
1
2
3
4
5
6
7
| @SpringBootApplication
public class NativeConfigClientApplication {
public static void main(String[] args) {
SpringApplication.run(NativeConfigClientApplication.class,args);
}
}
|
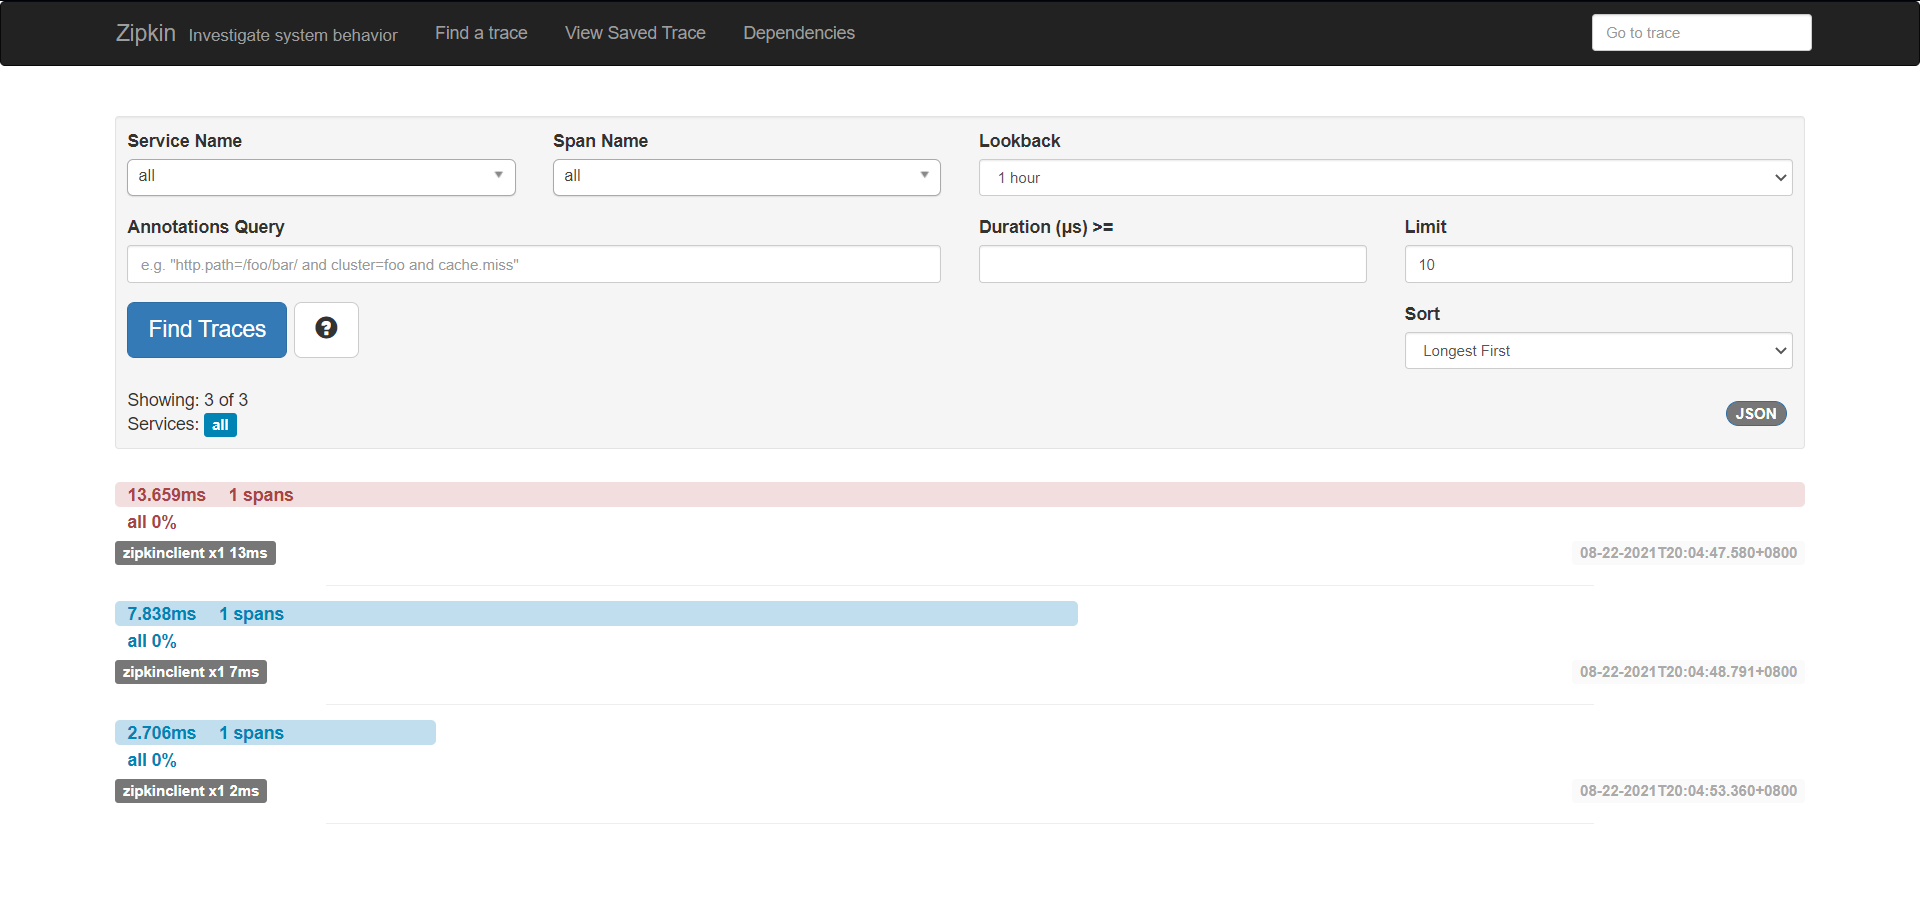
服务跟踪 zipkin
Zipkin 是一个可以采集并且跟踪分布式系统中请求数据的组件,让开发者可以更加直观的监控到请求在各个微服务所耗费的时间等
代码示例
1
2
3
4
5
6
7
8
9
10
11
12
13
14
15
16
17
18
19
20
| <dependencies>
<dependency>
<groupId>org.springframework.boot</groupId>
<artifactId>spring-boot-starter-web</artifactId>
<version>2.0.7.RELEASE</version>
</dependency>
<dependency>
<groupId>io.zipkin.java</groupId>
<artifactId>zipkin-server</artifactId>
<version>2.9.4</version>
</dependency>
<dependency>
<groupId>io.zipkin.java</groupId>
<artifactId>zipkin-autoconfigure-ui</artifactId>
<version>2.9.4</version>
</dependency>
</dependencies>
|
1
2
3
4
5
6
7
8
| @SpringBootApplication
@EnableZipkinServer
public class ZipkinApplication {
public static void main(String[] args) {
SpringApplication.run(ZipkinApplication.class,args);
}
}
|
@EnableZipkinServer:声明启动 Zipkin Server
1
2
3
4
5
6
7
8
9
10
11
12
| <dependencies>
<dependency>
<groupId>org.springframework.cloud</groupId>
<artifactId>spring-cloud-starter-zipkin</artifactId>
<version>2.0.2.RELEASE</version>
</dependency>
<dependency>
<groupId>org.springframework.cloud</groupId>
<artifactId>spring-cloud-starter-netflix-eureka-client</artifactId>
<version>2.0.2.RELEASE</version>
</dependency>
</dependencies>
|
1
2
3
4
5
6
7
8
9
10
11
12
13
14
15
16
17
| server:
port: 8090
spring:
application:
name: zipkinclient
sleuth:
sampler:
probability: 1.0
web:
client:
enabled: true
zipkin:
base-url: http://localhost:9090/
eureka:
client:
service-url:
defaultZone: http://localhost:8761/eureka/
|
spring.sleuth.web.client.enabled:设置开启请求跟踪
spring.sleuth.sampler.probability:设置采样比例,默认是 1.0
srping.zipkin.base-url:Zipkin Server 地址
1
2
3
4
5
6
7
8
9
10
11
12
| @RestController
@RequestMapping(value = "/zipkin")
public class ZipkinController {
@Value("${server.port}")
private String port;
@GetMapping(value = "/index")
public String index(){
return this.port;
}
}
|
1
2
3
4
5
6
7
| @SpringBootApplication
public class ZipkinClientApplication {
public static void main(String[] args) {
SpringApplication.run(ZipkinClientApplication.class,args);
}
}
|
springcloud项目流程
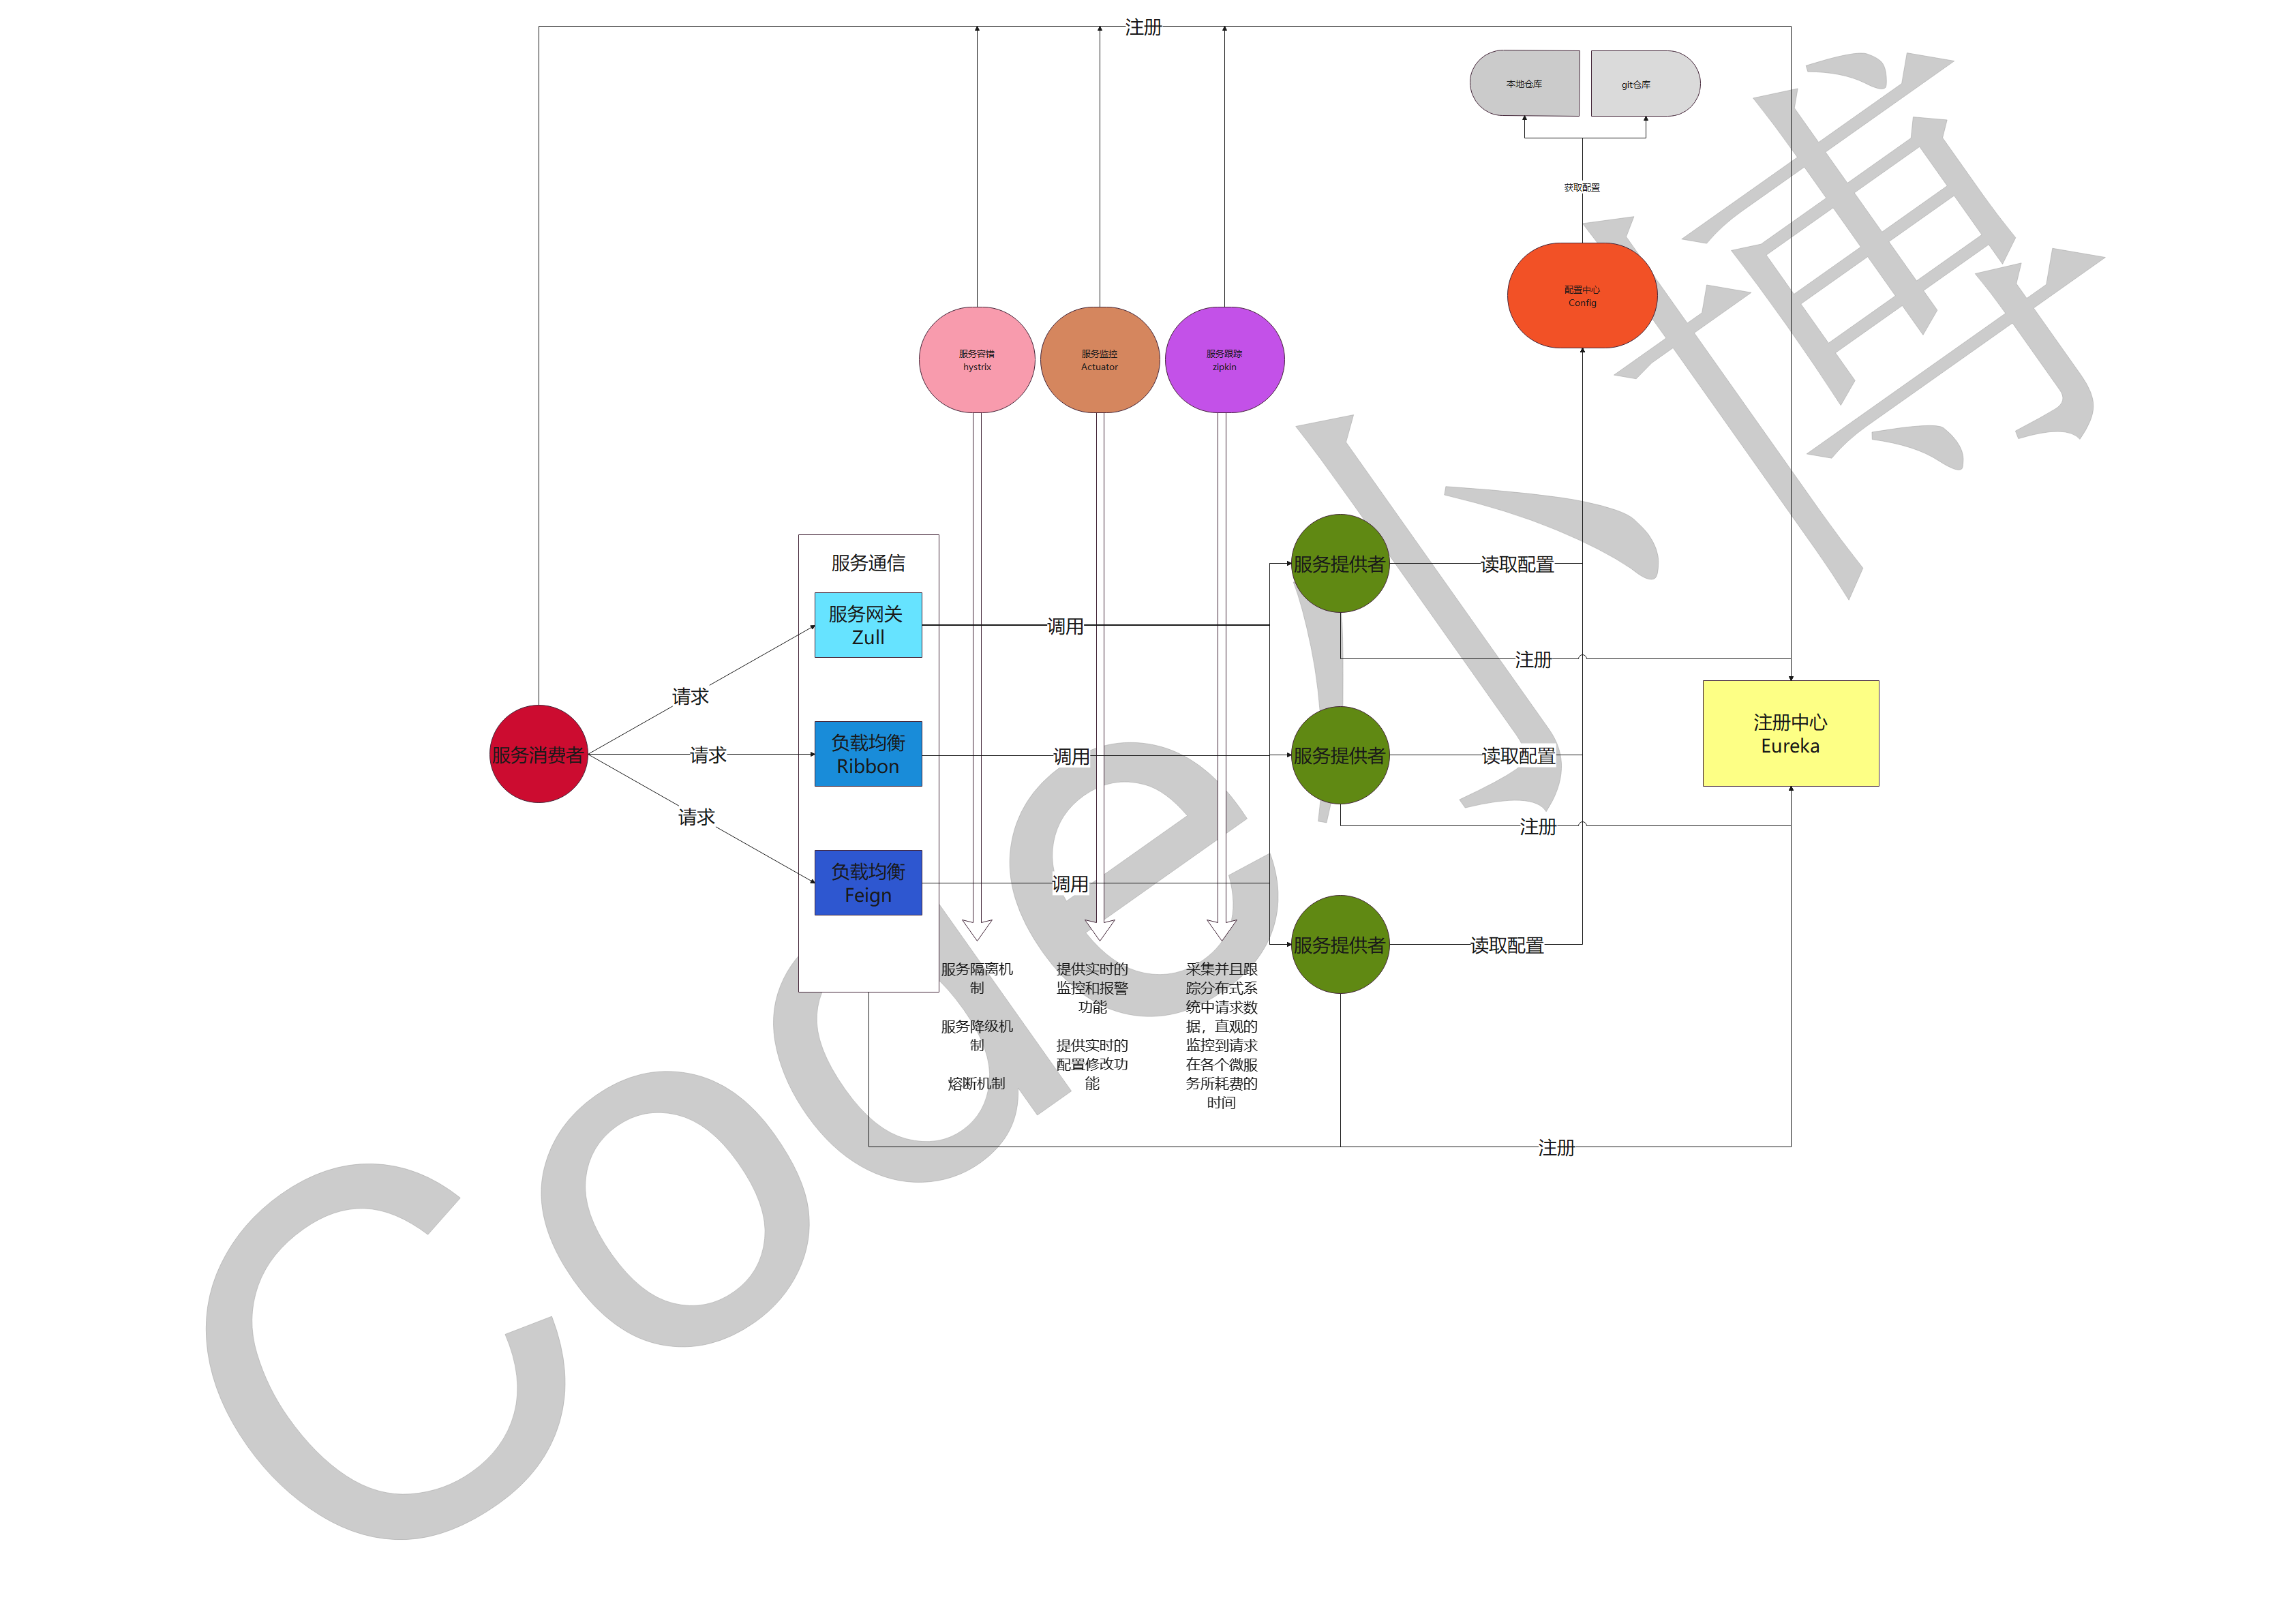
流程图图片地址
点击获取小博的流程图
正确的开始、微小的长进、然后持续、嘿、我是小博、带你一起看我目之所及的世界……