Spring框架
企业级开发框架、软件设计层框架、可将应用分层、开发者自主选择组件
Spring框架核心机制 IOC(控制反转)/DI(依赖注入)
AOP(面向切面编程)
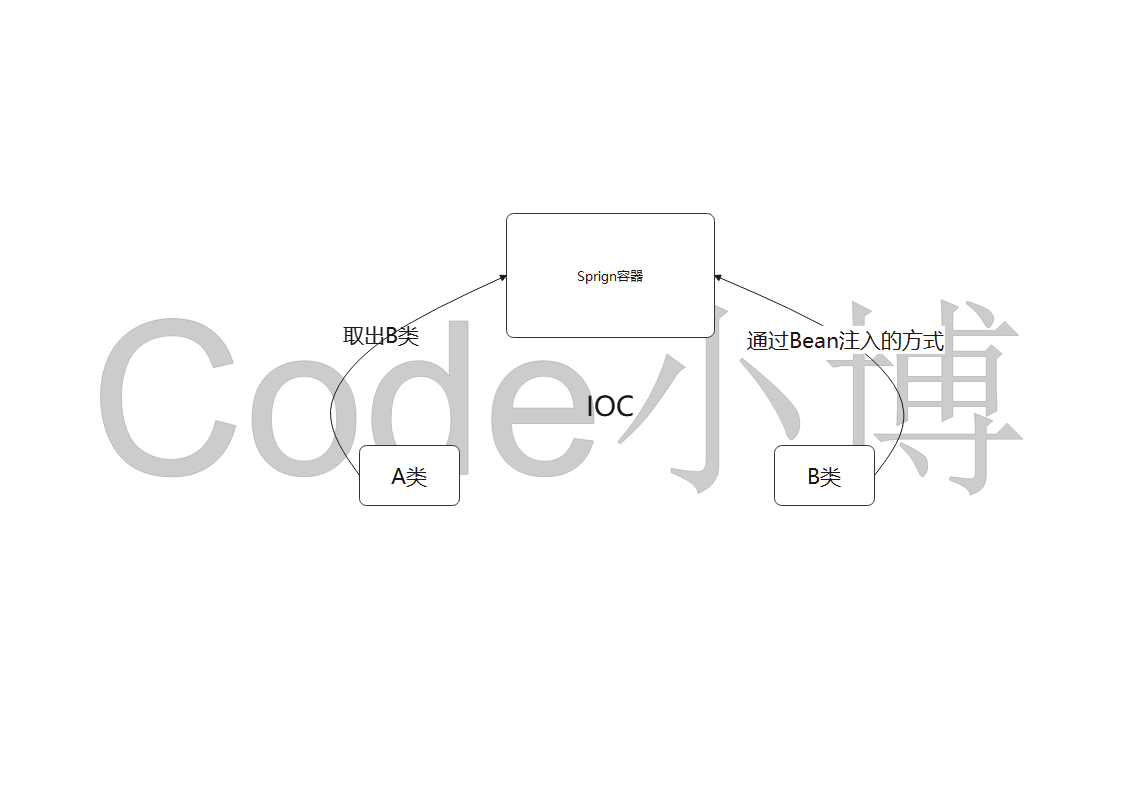
IOC(控制反转)
这里我们来举个例子、就好比我们有个A类、B类、当我们想使用B类时、通常做法是直接就new一个B类对象、而IOC就是提供了一个容器、我们不需要直接new一个B类对象、而是直接去容器里面取B类对象即可
使用方法 1 2 3 4 5 6 7 8 9 10 11 12 13 14 15 16 17 18 19 20 21 22 23 24 25 26 27 28 29 30 31 <?xml version="1.0" encoding="UTF-8"?> <project xmlns ="http://maven.apache.org/POM/4.0.0" xmlns:xsi ="http://www.w3.org/2001/XMLSchema-instance" xsi:schemaLocation ="http://maven.apache.org/POM/4.0.0 http://maven.apache.org/xsd/maven-4.0.0.xsd" > <modelVersion > 4.0.0</modelVersion > <groupId > com.dream.xiaobo</groupId > <artifactId > spring1</artifactId > <version > 1.0-SNAPSHOT</version > <dependencies > <dependency > <groupId > org.springframework</groupId > <artifactId > spring-context</artifactId > <version > 5.0.11.RELEASE</version > </dependency > <dependency > <groupId > org.projectlombok</groupId > <artifactId > lombok</artifactId > <version > 1.18.6</version > <scope > provided</scope > </dependency > </dependencies > </project >
1 2 3 4 5 6 7 8 @Data public class Student private Integer id; private String name; private Integer age; }
1 2 3 4 5 Student student = new Student(); student.setId(1 ); student.setName("小博" ); student.setAge(21 ); System.out.println(student);
1 2 3 4 5 6 7 8 9 10 11 12 13 <?xml version="1.0" encoding="UTF-8"?> <beans xmlns ="http://www.springframework.org/schema/beans" xmlns:xsi ="http://www.w3.org/2001/XMLSchema-instance" xsi:schemaLocation ="http://www.springframework.org/schema/beans http://www.springframework.org/schema/beans/spring-beans.xsd" > <bean id ="student" class ="com.dream.xiaobo.entity.Student" > <property name ="id" value ="1" /> <property name ="name" value ="小博" /> <property name ="age" value ="20" /> </bean > </beans >
1 2 3 ApplicationContext application = new ClassPathXmlApplicationContext("spring.xml" ); Student student = (Student)application.getBean("student" ); System.out.println(student);
IOC文件配置
id:对象名
1 2 3 4 5 6 7 8 9 10 11 <bean id ="person" class ="com.dream.xiaobo.entity.Person" > <property name ="id" value ="1" /> <property name ="name" value ="小博" /> <property name ="age" value ="21" /> <property name ="student" ref ="student" /> </bean > <bean id ="student" class ="com.dream.xiaobo.entity.Student" > <property name ="name" value ="xiaobo" /> <property name ="sex" value ="男" /> </bean >
IOC 底层原理模拟 1 2 3 4 5 6 7 8 9 10 11 @Data @AllArgsConstructor @NoArgsConstructor public class Person private Integer id; private String name; private Integer age; private Student student; }
1 2 3 4 5 public interface ApplicationContext public Object getBean (String id) }
1 2 3 4 5 6 7 8 9 10 11 12 13 14 15 16 17 18 19 20 21 22 23 24 25 26 27 28 29 30 31 32 33 34 35 36 37 38 39 40 41 42 43 44 45 46 47 48 49 50 51 52 53 54 55 56 57 58 59 60 61 62 63 64 65 66 67 68 69 70 71 72 73 74 75 76 77 78 79 80 81 82 83 84 85 86 87 public class ClassPathXmlApplicationContext implements ApplicationContext Map<String,Object> ioc = new HashMap<String, Object>(); public ClassPathXmlApplicationContext (String path) try { SAXReader reader = new SAXReader(); Document document = reader.read("./src/main/resources/" + path); Element root = document.getRootElement(); Iterator<Element> element = root.elementIterator(); while (element.hasNext()){ Element next = element.next(); String id = next.attributeValue("id" ); String className = next.attributeValue("class" ); Class clazz = Class.forName(className); Constructor constructor = clazz.getConstructor(); Object object = constructor.newInstance(); Iterator<Element> iterator = next.elementIterator(); while (iterator.hasNext()){ Element el = iterator.next(); String name = el.attributeValue("name" ); String valueStr = el.attributeValue("value" ); String ref = el.attributeValue("ref" ); if (ref == null ){ String s = "set" + name.substring(0 , 1 ).toUpperCase() + name.substring(1 ); Field field = clazz.getDeclaredField(name); Method method = clazz.getDeclaredMethod(s, field.getType()); Object value = null ; if (field.getType().getName() == "java.lang.Integer" ){ value = Integer.valueOf(valueStr); } if (field.getType().getName() == "java.lang.String" ){ value = valueStr; } method.invoke(object,value); } ioc.put(id,object); } } } catch (DocumentException e) { e.printStackTrace(); } catch (ClassNotFoundException e) { e.printStackTrace(); } catch (NoSuchMethodException e) { e.printStackTrace(); }catch (IllegalAccessException e) { e.printStackTrace(); } catch (InstantiationException e) { e.printStackTrace(); } catch (InvocationTargetException e) { e.printStackTrace(); } catch (NoSuchFieldException e) { e.printStackTrace(); } } public Object getBean (String id) return ioc.get(id); } }
1 2 3 4 5 6 public static void main (String[] args) ApplicationContext applicationContext = new ClassPathXmlApplicationContext("spring.xml" ); Person person = (Person)applicationContext.getBean("person" ); System.out.println(person); }
通过运行是类获取Bean 1 2 3 ApplicationContext application = new ClassPathXmlApplicationContext("spring.xml" ); Person person = (Person)application.getBean(Person.class); System.out.println(person);
通过有参构造赋值 1 2 3 4 5 <bean > <constructor-arg name ="id" value ="2" /> <constructor-arg name ="name" value ="xiaobo" /> <constructor-arg name ="age" value ="21" />
1 2 3 4 5 6 <bean > <constructor-arg index ="0" value ="3" /> <constructor-arg index ="1" value ="wyb" /> <constructor-arg index ="2" value ="21" /> </bean >
Bean注入集合 1 2 3 4 5 6 7 8 9 10 11 12 13 14 15 16 17 18 19 20 <bean id ="person" class ="com.dream.xiaobo.entity.Person" > <property name ="id" value ="1" /> <property name ="name" value ="小博" /> <property name ="age" value ="21" /> <property name ="students" > <list > <ref bean ="student" > </ref > <ref bean ="student2" > </ref > </list > </property > </bean > <bean id ="student" class ="com.dream.xiaobo.entity.Student" > <property name ="name" value ="xiaobo" /> <property name ="sex" value ="男" /> </bean > <bean id ="student2" class ="com.dream.xiaobo.entity.Student" > <property name ="name" value ="r" /> <property name ="sex" value ="女" /> </bean >
scope作用域
spring管理bean的作用域是靠scope控制的、共4种、默认值是singleton
1 <bean name ="student" class ="com.dream.xiaobo.entity.Student" scope ="singleton" />
1 2 3 4 5 6 7 8 9 10 11 public static void main (String[] args) ApplicationContext applicationContext = new ClassPathXmlApplicationContext("spring.xml" ); Student student1 = (Student)applicationContext.getBean("student" ); Student student2 = (Student)applicationContext.getBean("student" ); Student student3 = (Student)applicationContext.getBean("student" ); System.out.println(student1 == student2); System.out.println(student1 == student3); System.out.println(student2 == student3); }
由结果可得出、singleton通过IOC容器获得的Bean是唯一的、并且当spring.xml被加载时bean就被创建
1 <bean name ="student" class ="com.dream.xiaobo.entity.Student" scope ="prototype" />
1 2 3 4 5 6 7 8 9 ApplicationContext applicationContext = new ClassPathXmlApplicationContext("spring.xml" ); Student student1 = (Student)applicationContext.getBean("student" ); Student student2 = (Student)applicationContext.getBean("student" ); Student student3 = (Student)applicationContext.getBean("student" ); System.out.println(student1 == student2); System.out.println(student1 == student3); System.out.println(student2 == student3);
由结果可得出、prototype通过IOC容器获得的Bean是不同的、并且当业务获取IOC容器中bean时才被创建
在一次HTTP请求内有效
在一次用户会话内有效
Bean之间继承
子对象可以继承父对象的属性值、子对象必须包含父对象的所有属性、并且可以在父对象的基础上自行添加
1 2 3 4 5 <bean id ="student" class ="com.dream.xiaobo.entity.Student" > <property name ="name" value ="xiaobo" /> <property name ="sex" value ="男" /> </bean > <bean name ="user" class ="com.dream.xiaobo.entity.User" parent ="student" > </bean >
Bean之间依赖
被依赖的Bean先创建、在创建依赖的Bean、A依赖B、在创建B、在创建A
1 <bean name ="user" class ="com.dream.xiaobo.entity.User" depends-on ="student" > </bean >
工厂方法
1 2 3 4 <bean id ="car" class ="com.dream.xiaobo.factory.StaticCarFactory" factory-method ="getCar" > <constructor-arg value ="2" > </constructor-arg > </bean >
1 2 3 4 5 6 7 8 9 10 11 12 13 14 15 16 17 public class StaticCarFactory static Map<Long, Car> map = null ; static { map = new HashMap<Long, Car>(); map.put(1L ,new Car(1 ,"摩托车" )); map.put(2L ,new Car(2 ,"赛车" )); } public static Car getCar (Long id) return map.get(id); } }
1 2 3 4 5 <bean id ="instance" class ="com.dream.xiaobo.factory.InstanceCarFactory" /> <bean id ="car2" factory-bean ="instance" factory-method ="getCar" > <constructor-arg value ="2" > </constructor-arg > </bean >
1 2 3 4 5 6 7 8 9 10 11 12 13 14 ublic class InstanceCarFactory Map<Long, Car> map = null ; public InstanceCarFactory () map = new HashMap<Long, Car>(); map.put(1L ,new Car(1 ,"摩托车" )); map.put(2L ,new Car(2 ,"赛车" )); } public Car getCar (Long id) return map.get(id); } }
IOC自动装载(Autowire)
通过属性名自动装载
1 2 3 4 5 6 7 8 <bean id ="person" class ="com.dream.xiaobo.entity.Person" autowire ="byName" > <property name ="id" value ="1" /> <property name ="name" value ="xiaobo" /> <property name ="age" value ="21" /> </bean > <bean id ="student" class ="com.dream.xiaobo.entity.Student" > <property name ="name" value ="wang" /> <property name ="sex" value ="男" />
通过属性的数据类型自动装载、类型不能出现相同的否则报错
1 2 3 4 5 6 7 8 9 <bean id ="person" class ="com.dream.xiaobo.entity.Person" autowire ="byType" > <property name ="id" value ="1" /> <property name ="name" value ="xiaobo" /> <property name ="age" value ="21" /> </bean > <bean id ="student" class ="com.dream.xiaobo.entity.Student" > <property name ="name" value ="wang" /> <property name ="sex" value ="男" /> </bean >
AOP(面向切面)
动态的将代码切入到类指定的位置、将不同的方法的同一位置抽象成一个切面对象、然后对这个切面进行编程
1 2 3 4 5 6 7 8 9 10 11 12 13 14 15 16 17 18 19 20 21 22 23 24 @Component public class CalImpl implements Cal public double add (int a, int b) double result = a + b; return result; } public double sub (int a, int b) double result = a - b; return result; } public double mul (int a, int b) double result = a * b; return result; } public double div (int a, int b) double result = a / b; return result; } }
1 2 3 4 5 6 7 8 9 10 11 12 13 14 15 16 17 18 19 20 21 22 23 24 25 26 27 28 29 30 31 @Aspect @Component public class LoggerAspect @Before(value = "execution(public double com.dream.xiaobo.aop.impl.CalImpl.*(..))") public void before (JoinPoint joinPoint) String name = joinPoint.getSignature().getName(); String args = Arrays.toString(joinPoint.getArgs()); System.out.println(name + "的方法参数是" + args); } @After(value = "execution(public double com.dream.xiaobo.aop.impl.CalImpl.*(..))") public void after (JoinPoint joinPoint) String name = joinPoint.getSignature().getName(); System.out.println(name + "方法执行完毕" ); } @AfterReturning(value = "execution(public double com.dream.xiaobo.aop.impl.CalImpl.*(..))",returning = "result") public void afterRetrun (JoinPoint joinPoint,Object result) String name = joinPoint.getSignature().getName(); System.out.println(name + "方法的结果是:" + result); } @AfterThrowing(value = "execution(public double com.dream.xiaobo.aop.impl.CalImpl.*(..))",throwing = "exception") public void afterThread (JoinPoint joinPoint,Exception exception) String name = joinPoint.getSignature().getName(); System.out.println(name + "方法的异常:" + exception); } }
1 2 3 4 5 6 7 8 9 10 11 12 13 14 15 16 17 <?xml version="1.0" encoding="UTF-8"?> <beans xmlns ="http://www.springframework.org/schema/beans" xmlns:xsi ="http://www.w3.org/2001/XMLSchema-instance" xmlns:context ="http://www.springframework.org/schema/context" xmlns:aop ="http://www.springframework.org/schema/aop" xsi:schemaLocation ="http://www.springframework.org/schema/beans http://www.springframework.org/schema/beans/spring-beans-4.2.xsd http://www.springframework.org/schema/aop http://www.springframework.org/schema/aop/spring-aop-3.0.xsd http://www.springframework.org/schema/context http://www.springframework.org/schema/context/spring-context-4.2.xsd" > <context:component-scan base-package ="com.dream.xiaobo.aop" /> <aop:aspectj-autoproxy /> </beans >
1 2 3 4 5 6 7 8 public static void main (String[] args) ApplicationContext applicationContext = new ClassPathXmlApplicationContext("spring-aop.xml" ); Cal calImpl = (Cal)applicationContext.getBean("calImpl" ); calImpl.add(4 ,2 ); calImpl.sub(4 ,2 ); calImpl.mul(4 ,2 ); calImpl.div(4 ,0 ); }
定义该类为切面类
将类注入到IOC容器
切入方法执行的具体位置和时机
对包中所有类进行扫描、如果该类被注入到容器中了、则使用IOC管理这个类
使@Aspect标注过的类自动生成动态代理对象
切⾯:横切关注点被模块化的抽象对象
正确的开始、微小的长进、然后持续、嘿、我是小博、带你一起看我目之所及的世界……