
spring 复习整理三(仗剑走天涯)
Resource
Resource接口
1
2
3
4
5
6
7
8
9
10
11
12
13
14
15
16
| public interface Resource extends InputStreamSource {
boolean exists();
boolean isReadable();
boolean isOpen();
boolean isFile();
URL getURL() throws IOException;
URI getURI() throws IOException;
File getFile() throws IOException;
ReadableByteChannel readableChannel() throws IOException;
long contentLength() throws IOException;
long lastModified() throws IOException;
Resource createRelative(String relativePath) throws IOException;
String getFilename();
String getDescription();
}
|
内置的Resource实现
UrlResource
包装了java.net.URL,可以用来访问任何需要通过URL访问的对象,例如文件、HTTPS目标、FTP目标等。 所有URL都用一个标准化的“String”表示,这样就可以使用适当的标准化前缀来表示不同类型的URL。 这包括用于访问文件系统路径的’ file: ‘,用于通过https协议访问资源的’ https: ‘,用于通过ftp访问资源的’ ftp: ‘等
ClassPathResource
该类表示应该从【类路径】中获取的资源。 它使用线程上下文类装入器、给定的类装入器或给定的类装入资源
FileSystemResource
java.io的【Resource】实现
PathResource
java.nio.file 的【资源】实现
ServletContextResource
ServletContext 资源的【Resource】实现,它解释了相关web应用程序根目录中的相对路径
一个【InputStreamResource】是一个给定的【InputStream】的【Resource】实现。 只有当没有特定的【资源】实现适用时,才应该使用它。 特别是,如果可能的话,最好使用【ByteArrayResource】或任何基于文件的【Resource】实现
ByteArrayResource
这是一个给定字节数组的【资源】实现。 它为给定的字节数组创建一个ByteArrayInputStream
它可以从任何给定的字节数组加载内容,而不需要求助于一次性使用的InputStreamResource
ResourceLoader接口
ResourceLoader 接口定义了加载资源的基本能力和方式
1
2
3
4
5
6
| public interface ResourceLoader {
Resource getResource(String location);
ClassLoader getClassLoader();
}
|
所有应用程序上下文(applicationContext)都实现了【ResourceLoader】接口。 因此,可以所有的【应用程序上下文实现(ClassPathXmlA…)】都拥有加载资源的能力
getResource()参数前缀
| 前缀 |
举例 |
说明 |
| classpath: |
classpath:com/dream/xiaobo/config.xml |
从类路径加载 |
| file: |
file:///data/config.xml |
作为一个“URL”从文件系统加载。 请参见’ FileSystemResource ‘ Caveats |
| https: |
https://myserver/logo.png |
作为一个 URL加载 |
| (none) |
/data/config.xml |
依赖于底层的 ApplicationContext |
应用环境和资源路径
应用程序上下文构造函数通常采用【字符串或字符串数组】作为资源的位置路径 例如组成上下文定义的XML文件
源路径中的通配符
Ant-style的匹配原则
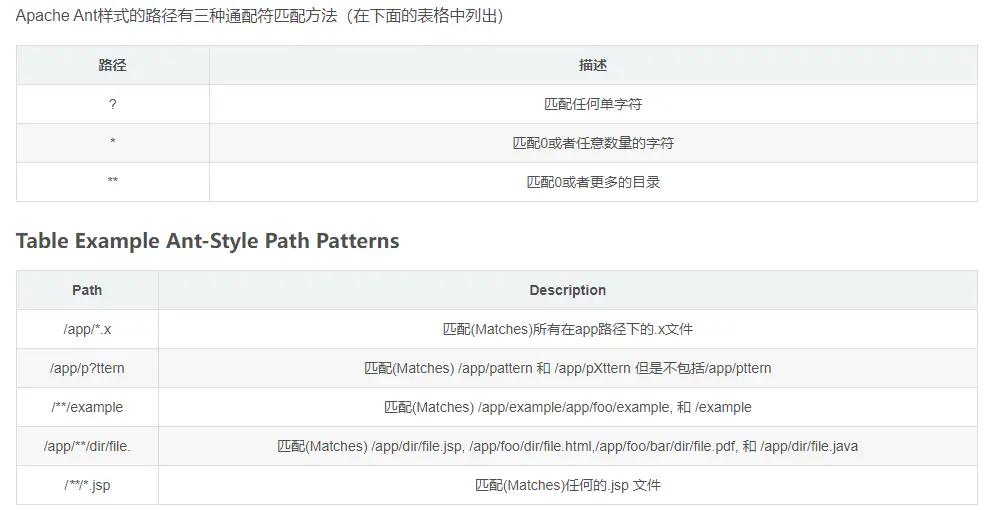
例
1
2
3
4
| /WEB-INF/*-context.xml
com/mycompany/**/applicationContext.xml
file:C:/some/path/*-context.xml
classpath:com/mycompany/**/applicationContext.xml
|
classpath:和classpath*:的区别
classpath: :表示从该工程中的类路径中加载资源,classpath:和classpath:/是等价的,都是相对于类的根路径。资源文件库标准的在文件系统中,也可以在JAR或ZIP的类包中
classpath*:假设多个JAR包或文件系统类路径都有一个相同的配置文件,classpath:只会在第一个加载的类路径下查找,而【classpath*:】会扫描所有这些JAR包及类路径下出现的同名文件
验证、数据绑定和类型转换
BeanWrapper
bean包中一个非常重要的类是【BeanWrappe】接口及其相应的实现(【BeanWrapperImpl】)。 正如在javadoc中引用的,【BeanWrapper】提供了【设置和获取属性值】、【获取属性描述符】等功能。 此外,【BeanWrapper】提供了对嵌套属性的支持,允许对子属性进行无限深度的检索。 说的简单一点,就是这个类能帮助我对使用更简单的api通过反射操作一个bean的属性
BeanWrapper属性操作
设置和获取属性是通过【BeanWrapper】的’ setPropertyValue ‘和’ getPropertyValue ‘重载方法变体来完成的
1
2
3
4
5
6
7
8
9
10
11
12
13
14
15
| @Test
public void test(){
BeanWrapper wrapper = new BeanWrapperImpl(new Person());
wrapper.setPropertyValue("name","xiaobo");
wrapper.setPropertyValue("student",new Student());
wrapper.setPropertyValue("student.name","wangyibo");
wrapper.setPropertyValue("student.age","22");
System.out.println(wrapper.getWrappedInstance());
}
|
PropertyEditor属性编辑器
Spring使用【PropertyEditor】的概念来实现【对象】和【字符串】之间的转换
propertyEditor 的实现
| 分类 |
释义 |
| ClassEditor |
将表示类的字符串解析为实际类,反之亦然。 当未找到类时,将抛出一个’ IllegalArgumentException ‘。 默认情况下,由’ BeanWrapperImpl ‘注册 |
| CustomBooleanEditor |
布尔属性 的属性编辑器。完成字符串和布尔值的转化。 默认情况下,由’ BeanWrapperImpl ‘注册 |
| CustomCollectionEditor |
集合的属性编辑器,将给定的描述集合的字符串转化为目标 集合类型 |
| CustomDateEditor |
可自定义的属性编辑器,支持自定义【日期格式】。 默认未注册。 必须根据需要使用适当的格式进行用户注册 |
| ByteArrayPropertyEditor |
字节数组的编辑器, 将字符串转换为对应的字节表示形式。 默认情况下由’ BeanWrapperImpl ‘注册 |
| CustomNumberEditor |
可自定义任何【数字类】的属性编辑器,如“整数”、“长”、“Float”或“Double”。 默认情况下,由’ BeanWrapperImpl ‘注册,但可以通过将其自定义实例注册为自定义编辑器来覆盖 |
| FileEditor |
将字符串解析为【java.io.file】的对象。 默认情况下,由’ BeanWrapperImpl ‘注册 |
| LocaleEditor |
可以将字符串解析为’ Locale ‘对象,默认情况下,由’ BeanWrapperImpl ‘注册 |
| PatternEditor |
可以将字符串解析为’ java.util.regex。 模式的对象,反之亦然 |
| PropertiesEditor |
可以转换字符串到’ Properties ‘对象。 默认情况下,由’ BeanWrapperImpl ‘注册 |
| StringTrimmerEditor |
修剪字符串的属性编辑器。 允许将空字符串转换为’ null ‘值。 默认情况下未注册-必须是用户注册的 |
| URLEditor |
可以将URL的字符串表示形式解析为实际的’ URL ‘对象。 默认情况下,由’ BeanWrapperImpl ‘注册 |
当将bean属性设置为【字符串值】时,Spring IoC容器最终使用标准JavaBeans的PropertyEditor实现将这些字符串转换为属性的复杂类型
1
2
3
4
5
6
7
8
| public class Person {
private String name;
private Student student;
}
|
1
2
3
4
5
6
7
8
| public class Student {
private String name;
private Integer age;
}
|
1
2
3
4
5
6
7
8
9
10
11
12
| public class PersonEditor extends PropertyEditorSupport {
@Override
public void setAsText(String text) throws IllegalArgumentException {
Student student = new Student();
student.setName(text);
student.setAge(22);
super.setValue(student);
}
}
|
1
2
3
4
5
6
7
8
9
10
11
12
13
14
15
16
17
18
19
20
21
22
23
24
| <?xml version="1.0" encoding="UTF-8"?>
<beans xmlns="http://www.springframework.org/schema/beans"
xmlns:xsi="http://www.w3.org/2001/XMLSchema-instance"
xmlns:p="http://www.springframework.org/schema/p"
xmlns:context="http://www.springframework.org/schema/context"
xsi:schemaLocation="http://www.springframework.org/schema/beans
https://www.springframework.org/schema/beans/spring-beans.xsd
http://www.springframework.org/schema/context
https://www.springframework.org/schema/context/spring-context.xsd">
<bean id="person" class="com.dream.xiaobo.entity.Person">
<property name="name" value="xiaobo"/>
<property name="student" value="wangyibo"/>
</bean>
<bean class="org.springframework.beans.factory.config.CustomEditorConfigurer">
<property name="customEditors">
<map>
<entry key="com.dream.xiaobo.entity.Student" value="com.dream.xiaobo.editor.PersonEditor"/>
</map>
</property>
</bean>
</beans>
|
1
2
3
4
5
6
7
8
9
10
| @Test
public void test2(){
ApplicationContext applicationContext = new ClassPathXmlApplicationContext("editor.xml");
Person bean = applicationContext.getBean(Person.class);
LOGGER.info("{}",bean);
}
|
类型转换
Spring 3核心包提供了一个【通用类型转换系统】。 在Spring容器中,您可以使用此系统作为【PropertyEditor】的替代方案,将外部化bean属性值字符串转换为所需的属性类型
Converter
1
2
3
4
5
6
7
| package org.springframework.core.convert.converter;
public interface Converter<S, T> {
T convert(S source);
}
|
创建你自己的转换器,需要实现【转换器】接口,并使用泛型“S”作为你要转换的【原始类型】,“T”作为你要转换的【目标类型】
ConversionService
1
2
3
4
5
6
7
8
9
10
11
12
| package org.springframework.core.convert;
public interface ConversionService {
boolean canConvert(Class<?> sourceType, Class<?> targetType);
<T> T convert(Object source, Class<T> targetType);
boolean canConvert(TypeDescriptor sourceType, TypeDescriptor targetType);
Object convert(Object source, TypeDescriptor sourceType, TypeDescriptor targetType);
}
|
大多数ConversionService实现也实现ConverterRegistry,它提供了一个用于注册转换器的API。
spring提供了一个强大的ConversionService实现,即 GenericConversionService ,他是适合在大多数环境中使用的通用实现。Spring会选择 ConversionService,并在框架需要执行类型转换时使用它。
要在Spring中注册默认的conververService ,请添加以下带有converversionservice id 的beanDifination
1
2
| <bean id="conversionService"
class="org.springframework.context.support.ConversionServiceFactoryBean"/>
|
例
1
2
3
4
5
6
7
8
9
10
| public class Student {
private String name;
private Integer age;
private Date birthday;
}
|
1
2
3
4
5
6
7
8
9
10
11
12
13
14
15
16
| public class StringToDataConverter implements Converter<String,Date> {
@Override
public Date convert(String s) {
String path = "yyyy-MM-dd";
SimpleDateFormat simpleDateFormat = new SimpleDateFormat(path);
try {
return simpleDateFormat.parse(s);
} catch (ParseException e) {
throw new RuntimeException("类型转换失败");
}
}
}
|
1
2
3
4
5
6
7
8
9
10
11
12
| <bean id="student" class="com.dream.xiaobo.entity.Student">
<property name="name" value="xiaobo"/>
<property name="age" value="22"/>
<property name="birthday" value="2001-04-06"/>
</bean>
<bean id="conversionService" class="org.springframework.context.support.ConversionServiceFactoryBean">
<property name="converters">
<set>
<bean class="com.dream.xiaobo.converter.StringToDataConverter"/>
</set>
</property>
</bean>
|
1
2
3
4
5
6
7
8
9
10
| @Test
public void test3(){
ApplicationContext applicationContext = new ClassPathXmlApplicationContext("editor.xml");
Student bean = applicationContext.getBean(Student.class);
LOGGER.info("{}",bean);
}
|
DataBinder数据验证
从Spring 3开始,你就可以用一个【Validator】配置一个【DataBinder】实例。 一旦配置完成,您就可以通过调用【binder.validate() 】来调用【 Validator】。 任何验证’ Errors ‘都会自动添加到绑定的’ BindingResult ‘中
1
2
3
4
5
6
7
8
9
10
11
12
13
14
15
16
17
18
19
20
| public class MyValidator implements Validator {
@Override
public boolean supports(Class<?> clazz) {
return Student.class == clazz;
}
@Override
public void validate(Object target, Errors errors) {
Student student = (Student) target;
if (student.getAge() < 25){
errors.rejectValue("age","1001",
"我们招聘的是三年工作经验的,而您只有" + student.getAge() + "岁");
}
}
}
|
1
2
3
4
5
6
7
8
9
10
11
12
13
14
15
16
17
| @Test
public void test4(){
Student student = new Student();
student.setAge(22);
DataBinder dataBinder = new DataBinder(student);
dataBinder.addValidators(new MyValidator());
dataBinder.validate();
BindingResult bindingResult = dataBinder.getBindingResult();
LOGGER.info("{}",bindingResult);
}
|
spring表达式 (SpEL)
1
2
3
4
5
6
7
8
9
10
11
12
13
14
15
16
| @Test
public void test5(){
ExpressionParser parser = new SpelExpressionParser();
Expression expression = parser.parseExpression("'xiaobo'.toUpperCase()");
LOGGER.info("{}",expression.getValue());
Student student = new Student();
student.setName("小博");
expression = parser.parseExpression("name");
LOGGER.info("{}",expression.getValue(student));
}
|
【ExpressionParser】接口【负责解析表达式字符串】。 在前面的示例中,表达式字符串是由单引号表示的字符串字面量。 【Expression】接口负责计算前面定义的表达式字符串。 当调用parser 时,可以抛出ParseException和EvaluationException两个异常
Bean 定义中的表达式
您可以使用SpEL表达式和基于xml或基于注解的配置元数据来定义【BeanDefinition】实例。 在这两种情况下,定义表达式的语法形式都是#{}
应用程序上下文中的所有bean都可以作为具有公共bean名称的预定义变量使用。 这包括用于访问运行时环境的标准上下文bean,如environment(类型为’ org.springframework.core.env.Environment ‘),以及systemProperties和systemEnvironment
1
2
3
4
| <bean id="person" class="com.dream.xiaobo.entity.Student">
<property name="name" value="#{systemProperties['java.home']}"/>
<property name="age" value="#{T(java.lang.Math).random() * 100}"/>
</bean>
|
注解配置
1
2
3
4
5
6
7
8
9
10
| public class Student {
@Value("#{systemProperties['java.home']}")
private String name;
@Value("#{T(java.lang.Math).random() * 100}")
private Integer age;
}
|
AOP概述
面向切面编程(AOP)通过提供另一种考虑程序结构的方法对面向对象编程(OOP)进行了补充
OOP中模块化的关键单元是类,而AOP中模块化的关键单元是aspect(切面)
AOP关键点
Aspect(切面)
一个关注点的模块化 这个关注点可能会横切多个对象
Join point(连接点)
在程序执行过程中某个特定的点,比如某方法调用的时候或者处理异常的时候
Advice(通知)
在切面的某个特定的连接点(Joinpoint)上执行的动作。通知有各种类型,其中包括“around”、“before”和“after”等通知
Pointcut(切入点)
匹配连接点(Joinpoint)的断言。通知和一个【切入点表】达式关联,并在满足这个切入点的连接点上运行
Introduction(引入)
Spring允许引入新的接口(以及一个对应的实现)到任何被代理的对象
Target object(目标对象)
被一个或者多个切面(aspect)所通知(advise)的对象。也有人把它叫做 被通知(advised) 对象。 既然Spring AOP是通过运行时代理实现的,这个对象永远是一个 被代理(proxied) 对象。
AOP代理 AOP proxy
在Spring中,AOP代理可以是JDK动态(默认)代理或者CGLIB代理
Weaving(织入)
把切面(aspect)连接到其它的应用程序类型或者对象上,并创建一个被通知(advised)的对象,这个过程叫织入。 这些可以在编译时(例如使用AspectJ编译器),类加载时和运行时完成
AOP通知类型
Before advice:在连接点之前运行的通知,但不能阻止执行流继续执行到连接点(除非它抛出异常)
After returning advice:在连接点正常完成后运行的通知(例如,如果方法返回而不引发异常)
After throwing advice:在方法通过抛出异常退出时运行的通知
After (finally) advice:不管连接点以何种方式退出(正常或异常返回),都要运行的通知
Around advice:围绕连接点(如方法调用)的通知。 这是最有力的建议。 Around通知可以在方法调用前后执行自定义行为。 它还负责选择是继续到连接点,还是通过返回自己的返回值或抛出异常来简化被通知的方法执行。
@AspectJ的支持
开启@AspectJ的两种方式
1
2
3
4
5
6
7
8
9
10
11
12
13
14
15
16
17
18
| <?xml version="1.0" encoding="UTF-8"?>
<beans xmlns="http://www.springframework.org/schema/beans"
xmlns:xsi="http://www.w3.org/2001/XMLSchema-instance"
xmlns:p="http://www.springframework.org/schema/p"
xmlns:context="http://www.springframework.org/schema/context"
xmlns:aop="http://www.springframework.org/schema/aop"
xsi:schemaLocation="http://www.springframework.org/schema/beans
https://www.springframework.org/schema/beans/spring-beans.xsd
http://www.springframework.org/schema/context
https://www.springframework.org/schema/context/spring-context.xsd
http://www.springframework.org/schema/aop
https://www.springframework.org/schema/aop/spring-aop.xsd">
<aop:aspectj-autoproxy/>
</beans>
|
1
2
3
4
5
6
7
| @Configuration
@ComponentScan("com.dream.xiaobo")
@EnableAspectJAutoProxy
public class AspectConfig {
}
|
声明切入点
1
2
3
4
| @Pointcut("execution(public * com.dream.xiaobo.service..*.*())")
public void beforePointcut(){
}
|
execution: (常用)用于匹配方法执行的连接点,这是在使用Spring AOP时使用的主要切入点指示符
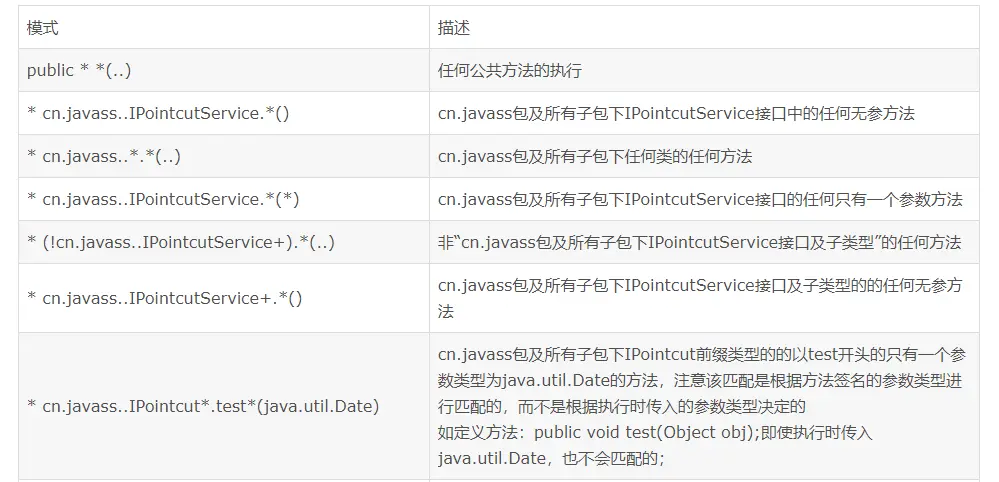
within: 用于匹配指定类型内的方法执行。(匹配整个类)

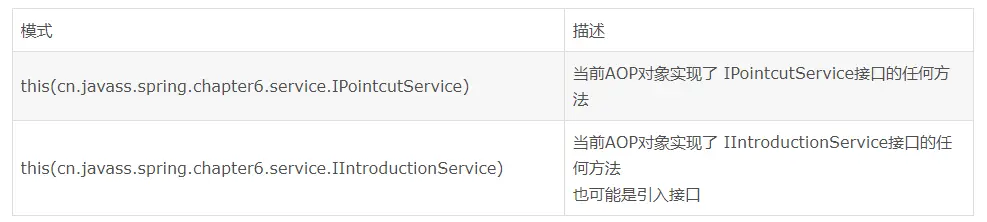
this: 用于匹配当前【AOP代理对象】类型的执行方法;注意是AOP代理对象的类型匹配,这样就可能【包括引入接口】也进行类型匹配。(配置整个类)
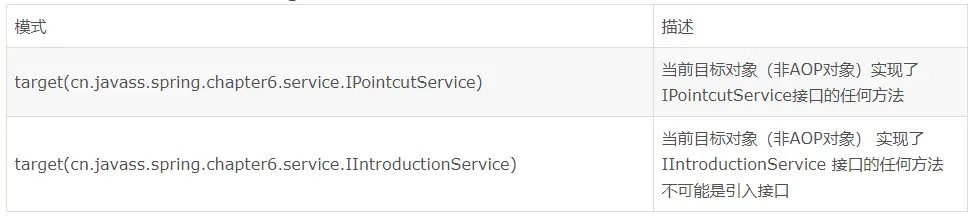
target: 用于匹配当前目标对象类型的执行方法;注意是目标对象的类型匹配,这样就【不包括引入接口】也进行类型匹配。(配置整个类)
args: 限制匹配连接点(使用Spring AOP时的方法执行),其中参数是给定类型的实例。 (参数类型匹配)

@target: 用于匹配当前目标对象类型的执行方法,其中目标对象持有指定的注解 。(类上的注解)

@args: 用于匹配当前执行的方法传入的参数持有指定注解的执行。(参数上的注解)

@within: 用于匹配所有持有指定注解类型内的方法。(类上的注解)

@annotation: (常用)于匹配当前执行方法持有指定注解的方法。(方法上的注解)

声明通知
1
2
3
4
5
6
7
8
9
10
11
12
13
14
15
16
17
18
19
20
21
22
23
24
25
26
27
28
29
30
31
32
33
34
35
36
37
38
39
40
41
42
43
44
45
46
47
48
49
50
51
52
53
54
55
56
| @Aspect
@Component
public class MyAspect {
@DeclareParents(value = "com.dream.xiaobo.service.impl.OrderServiceImpl",defaultImpl = GiveServiceImpl.class)
private static GiveService giveService;
@Pointcut("execution(public * com.dream.xiaobo.service..*.*())")
    public void beforePointcut(){

    }
@Pointcut("execution(public * com.dream.xiaobo.service..*.*())")
public void afterPointcut(){
}
@Before("beforePointcut()")
public void before(){
System.out.println("前置处理器");
}
@After("beforePointcut()")
public void after(){
System.out.println("后置处理器");
}
@AfterReturning("beforePointcut()")
public void afterReturning(){
System.out.println("this is afterReturning");
}
@Around("execution(public * com.dream.xiaobo.service..*.*())")
public Object around(ProceedingJoinPoint point) throws Throwable {
System.out.println("ProceedingJoinPoint point 环绕通知用到的参数");
Object proceed = point.proceed();
System.out.println("this is around 2");
return proceed;
}
@AfterThrowing("afterPointcut()")
public void afterThread(){
System.out.println("this is afterThrowing");
}
}
|
Around advice环绕匹配的方法执行 它有机会在方法运行之前和之后进行工作,并确定方法何时、如何运行,甚至是否真正运行。 如果您需要在方法执行之前和之后以线程安全的方式共享状态(例如,启动和停止计时器),经常使用Around通知
Around通知是通过使用【@Around】注解声明的。 advice方法的第一个参数必须是【ProceedingJoinPoint】类型。 在通知体中,在【ProceedingJoinPoint】上调用【proceed()】会导致底层方法运行。 【proceed】方法也可以传入【Object[] 】。 当方法执行时,数组中的值被用作方法执行的参数
通知的参数
任何通知方法都可以声明一个类型为org.aspectj.lang.JoinPoint的参数作为它的第一个参数(注意,around通知需要声明类型为’ ProceedingJoinPoint )的第一个参数,它是oinPoint的一个子类
JoinPoint接口提供的方法
getArgs(): 返回方法参数
getThis(): 返回代理对象
getTarget(): 返回目标对象
getSignature(): 返回被通知的方法的签名
toString(): 打印被建议的方法的有用描述
引入Introduction
引入使切面能够声明被通知的对象【实现给定的接口】,也就是让代理对象实现新的接口
1
2
| @DeclareParents(value = "com.dream.xiaobo.service.impl.OrderServiceImpl",defaultImpl = GiveServiceImpl.class)
private static GiveService giveService;
|
1
2
3
4
5
6
7
| public class GiveServiceImpl implements GiveService
{
@Override
public void give() {
System.out.println("这是下单送您的礼物");
}
}
|
基于schema的AOP支持
就是用xml方式来进行配置
1
2
3
4
5
6
7
8
9
10
11
12
13
14
15
16
17
18
19
20
21
22
23
24
25
26
27
28
29
30
31
32
33
34
35
36
| <?xml version="1.0" encoding="UTF-8"?>
<beans xmlns="http://www.springframework.org/schema/beans"
xmlns:xsi="http://www.w3.org/2001/XMLSchema-instance"
xmlns:p="http://www.springframework.org/schema/p"
xmlns:context="http://www.springframework.org/schema/context"
xmlns:aop="http://www.springframework.org/schema/aop"
xsi:schemaLocation="http://www.springframework.org/schema/beans
https://www.springframework.org/schema/beans/spring-beans.xsd
http://www.springframework.org/schema/context
https://www.springframework.org/schema/context/spring-context.xsd
http://www.springframework.org/schema/aop
https://www.springframework.org/schema/aop/spring-aop.xsd">
<bean id="myAop" class="com.dream.xiaobo.aspect.MyAop"/>
<bean id="orderService" class="com.dream.xiaobo.service.impl.OrderServiceImpl"/>
<bean id="userService" class="com.dream.xiaobo.service.impl.UserServiceImpl"/>
<aop:config>
<aop:aspect id="aop" ref="myAop">
<aop:pointcut id="pointcut" expression="execution(public * com.dream.xiaobo.service..*.*())"/>
<!-- <aop:after pointcut-ref="pointcut" method="after"/>-->
<!-- <aop:before pointcut-ref="pointcut" method="before"/>-->
<!-- <aop:after-returning method="afterReturning" pointcut-ref="pointcut"/>-->
<!-- <aop:after-throwing method="afterThread" pointcut-ref="pointcut"/>-->
<aop:around pointcut-ref="pointcut" method="around"/>
</aop:aspect>
</aop:config>
</beans>
|
编程方式创建Aspect
1
2
3
4
5
6
| public static void main(String[] args) {
AspectJProxyFactory aspectJProxyFactory = new AspectJProxyFactory(new OrderService());
aspectJProxyFactory.addAspect(MyAspect.class);
IOrderService proxy = (IOrderService)aspectJProxyFactory.getProxy();
proxy.order(111);
}
|
你知道的越多 你不知道的越多 嘿 我是小博 带你一起看我目之所及的世界……